

Ultimate Military 3D Printer Battlefield Repairs
Military 3d printer battlefield repairs are a critical skill set for maintaining operational readiness in forward-deployed environments. The ability to quickly fabricate replacement parts for vehicles, equipment, and electronics directly on-site transforms logistical challenges. Add-on printers speed part replacement, cut downtime, and reduce resupply strain, but only if the printers themselves are kept in perfect working order. This guide provides a definitive process for diagnosing and fixing common hardware and firmware issues under pressure.
Table of Contents
- Tools & Parts
- Step-by-Step Instructions
- Technical Profile & Risk
- Safer Alternatives & No-Parts Fixes
- Deployment & Testing
- Common Mistakes to Avoid
- Storage, Backups & Maintenance
- FAQs
- Conclusion
Tools & Parts
Before beginning any repair, ensure you have a standardized toolkit available. Scrambling for the right tool wastes valuable time when a mission-critical part is needed. A well-organized kit is the foundation of efficient additive manufacturing support.
Essential Tools:
- Digital Multimeter: For checking continuity, voltage, and resistance on components like heaters and thermistors.
- Hex Key & Wrench Set (Metric): For disassembling the frame, hotend, and extruder assembly.
- Wire Strippers & Crimpers: For replacing connectors or repairing damaged wiring looms.
- Flush Cutters: Essential for trimming filament cleanly and snipping zip ties.
- Heat Gun or High-Power Hair Dryer: For loosening seized parts or heat-setting shrink tubing.
- Brass Wire Brush: For safely cleaning nozzles and heater blocks without causing damage.

Common Replacement Parts:
- Nozzles (various sizes)
- PTFE Tubing
- Heater Cartridges
- Thermistors
- Stepper Motor Drivers
- Cooling Fans (Hotend and Part Cooling)
Step-by-Step Instructions for Military 3D Printer Battlefield Repairs
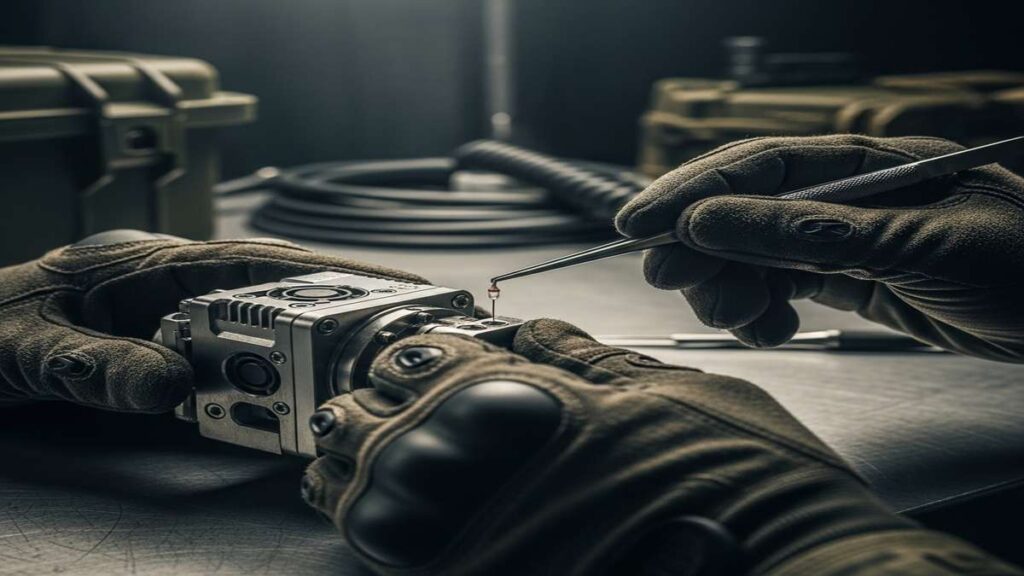
This section details a common and critical repair: replacing a failed hotend thermistor. A faulty thermistor provides incorrect temperature readings to the mainboard, leading to failed prints, dangerous overheating, or a complete system halt. Following these steps ensures a safe and effective replacement.
Step 1: Initial Diagnosis and Safety Protocol
First, confirm the thermistor is the problem. Error messages like “Thermal Runaway” or “MINTEMP” are strong indicators. Before touching any components, power down the printer and disconnect it from its power source completely. Allow the hotend to cool to ambient temperature to prevent severe burns. This safety check is non-negotiable.
Step 2: Disassembly and Component Access
Carefully remove the fan shroud covering the hotend assembly. This typically involves unscrewing two to four small bolts. Take a photo of the wire routing before you proceed. Locate the thermistor—it’s usually a small glass bead with two thin wires held in place by a tiny grub screw. Gently loosen this screw, being careful not to strip it. Trace its wires back to the mainboard or breakout board.
Step 3: Performing Critical Military 3D Printer Battlefield Repairs
Disconnect the old thermistor from the mainboard. Gently pull the old wires out from any cable sleeves or zip ties. Insert the new thermistor into the heater block and lightly tighten the grub screw. Do not overtighten, as this can crush the delicate glass bead. Route the new wires along the same path as the old ones and plug the connector into the correct port on the mainboard. Secure the wiring with fresh zip ties.
Step 4: Calibration After Military 3D Printer Battlefield Repairs
Reassemble the fan shroud. Power on the printer but do not start a print. Navigate the printer’s menu to the temperature control screen and set the hotend to a standard printing temperature (e.g., 200°C). Watch the temperature reading closely. It should rise steadily and stabilize at the target temperature without wild fluctuations. This confirms the new thermistor is working correctly.
| Step | Action | Why it helps | Time |
|---|---|---|---|
| 1 | Power Off & Disconnect | Prevents electrical shock and allows components to cool safely. | 5 mins |
| 2 | Remove Fan Shroud | Provides clear access to the hotend components (heater, thermistor). | 5 mins |
| 3 | Replace Thermistor | Swaps the faulty component with a functional one. | 10 mins |
| 4 | Reassemble & Secure Wires | Restores the printer’s physical integrity and prevents wire snags. | 5 mins |
| 5 | Power On & Test Heating | Verifies that the new thermistor is reading and reporting temperatures correctly. | 5 mins |
Technical Profile & Risk
Executing repairs in a non-ideal environment carries inherent risks. Dust, vibration, and unstable power can complicate even simple procedures. The primary technical risks include electrostatic discharge (ESD) damaging the mainboard, shorting a component by dropping a metal screw, or incorrectly connecting wiring, which can permanently damage the printer’s electronics. A failed repair not only wastes parts but also renders the printer useless, negating its strategic advantage. Meticulous execution of these military 3d printer battlefield repairs is paramount.
Safer Alternatives & No-Parts Fixes
Before disassembling hardware, always exhaust software-based solutions. Many printing issues that seem like hardware failures are actually rooted in firmware or slicer settings. A full factory reset or reflashing the firmware can often resolve persistent bugs or corrupted data. This should be a standard first step for non-obvious failures.
Additionally, consider these “no-parts” fixes:
- PID Autotune: Run this command from the printer’s terminal if you experience temperature fluctuations. It recalibrates the heating algorithm.
- Clear EEPROM: Reset stored settings to their firmware defaults.
- Reslice the Model: A corrupted G-code file can cause bizarre printer behavior. Try slicing the 3D model again.
Deployment & Testing
After any repair, a validation process is mandatory. Do not immediately start a 12-hour print for a critical component. Begin with a series of simple, fast calibration prints.
- Calibration Cube: Verifies dimensional accuracy and layer consistency.
- Temperature Tower: Confirms the new component works correctly across a range of temperatures.
- Benchy: A standard torture test that evaluates cooling, bridging, and overhang performance.
Only after the printer successfully completes these tests should it be deployed for operational tasks. This structured testing prevents wasted time and material.
Common Mistakes to Avoid
In high-pressure situations, mistakes are more likely. Being aware of common pitfalls can prevent a simple repair from becoming a catastrophic failure. Avoid overtightening screws, which can strip threads or crack plastic parts. Never work on electronics while the unit is powered on. Double-check all wire polarities before connecting them; reversing them can destroy a mainboard instantly.
Finally, never flash new firmware without backing up the existing configuration file. Losing these settings can be a time-consuming problem to fix, and you can learn more about how to avoid firmware corruption issues by reviewing detailed guides on the topic.
Storage, Backups & Maintenance
Properly managing spares and data is as important as the repair itself. Store sensitive electronic components like thermistors and mainboards in anti-static bags. Keep filament in dry boxes with desiccant to prevent moisture absorption, which ruins print quality.
Create a digital locker for your printer’s firmware, configuration files, and slicer profiles. Back this data up to a ruggedized USB drive. A weekly maintenance schedule, including checking belt tension, cleaning debris, and lubricating rods, will prevent many common failures from occurring in the first place, simplifying the overall challenge of military 3d printer battlefield repairs.
FAQs
What is the most common failure point on a deployed 3D printer?
By far, the most common issues occur in the “hot side” of the machine. This includes clogged nozzles from dusty environments, failed thermistors from thermal stress, and broken heater cartridge wires from constant movement and vibration.
How can I quickly determine if an issue is hardware or software?
Try printing a file that you know has printed successfully before. If it fails in the same way as the new file, the problem is likely hardware. If the old file prints perfectly, the issue is almost certainly with the new 3D model or its slicer settings.
Can I use spare parts from a different printer model in an emergency?
Sometimes, but it’s risky. Components like fans and stepper motors might be cross-compatible if their voltage and current ratings match. However, thermistors and mainboards are often proprietary. Using an incompatible part can lead to poor performance or permanent damage.
Conclusion
Mastering military 3d printer battlefield repairs is a force multiplier, enabling units to maintain independence and operational tempo without relying on fragile supply lines. By understanding the core principles of diagnosis, systematically performing repairs, and rigorously testing the results, operators can ensure these valuable assets remain online. These skills directly translate to reduced downtime and increased mission success. For a complete overview of advanced techniques, review our comprehensive guide to military 3d printer battlefield repairs.