
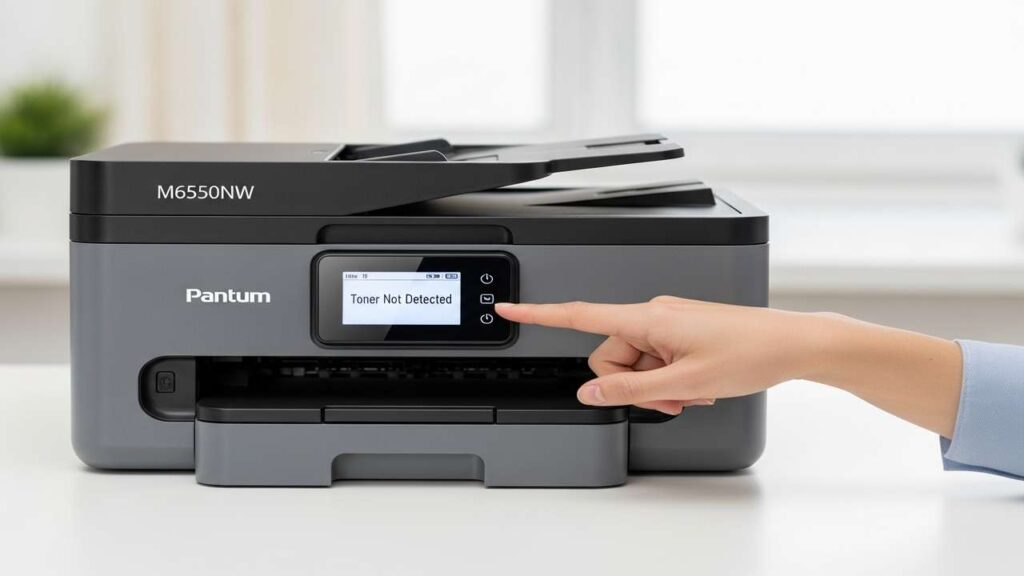
pantum m6550nw toner not detected — chip, contacts & reset
pantum m6550nw toner not detected usually appears when the printer can’t read the cartridge ID chip or the contacts don’t apply enough pressure. Use our pantum m6550nw toner not detected guide to clean the pins, reseat correctly, choose a firmware-compatible reset chip, and lock in a stable setup that won’t drop mid-print.
What the message really means
When the M6550NW boots or begins a job, it validates the toner cartridge’s chip. If the chip pads are oxidized, a spring pin is stuck, the front door doesn’t fully latch, or the firmware rejects the chip family, the device shows “Toner Not Detected.” The fix is methodical: contact → fit → chip → firmware → driver/queue hygiene.
Fast wins (start here)
Power-drain reset: Power off, unplug 60 seconds, hold the power button 10 seconds, reconnect, power on.
Firm reseat: Remove the cartridge, then insert straight until a positive latch—no rocking.
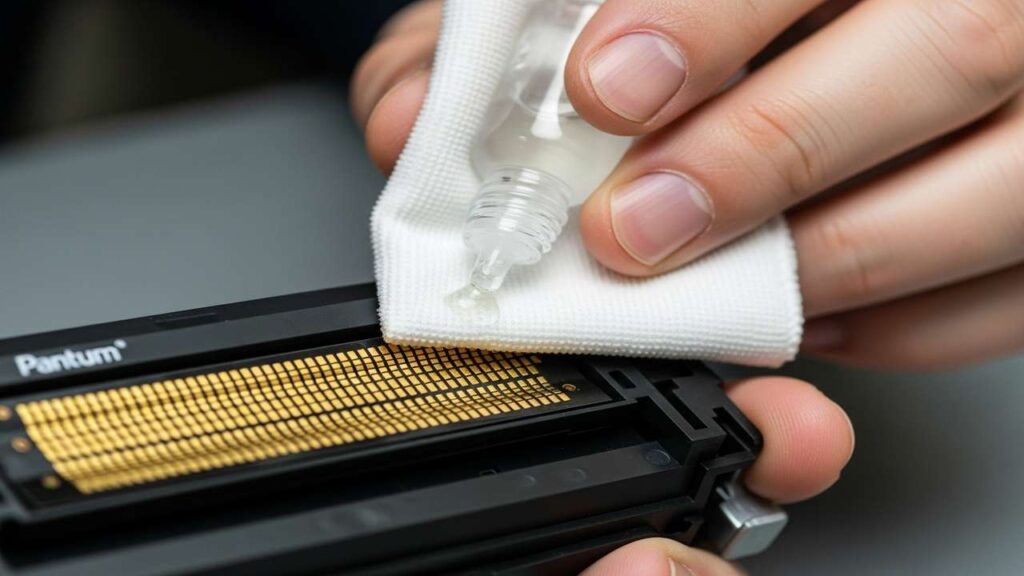
Clean both sides: Wipe the gold pads (cartridge chip) and the printer’s spring pins with a lint-free cloth lightly dampened with isopropyl alcohol; wait 60s to dry.
Known-good test: Try a verified cartridge from the same family (PB-210 / PB-211 depending on region). If it’s accepted immediately, your original chip is suspect.
Model notes that matter
The M6550NW commonly uses PB-210/PB-211 cartridges (regional variants exist). Always match the exact series printed on the old cartridge, and if the issue began right after a firmware update, plan on a reset chip that explicitly supports your current firmware family.
Step-by-step table (print this)
| Step | Action | Why it helps | Time |
|---|---|---|---|
| 1 | Power-drain reset (unplug 60s, hold power 10s) | Clears transient validation faults | 1–2 min |
| 2 | Remove cartridge; inspect chip pads | Finds obvious damage/oxidation | 1 min |
| 3 | Clean pads & spring pins (IPA + lint-free cloth) | Restores low-resistance contact | 2 min |
| 4 | Reseat straight & firm; close front door fully | Ensures full pin pressure on the chip | 1 min |
| 5 | Try a known-good PB-210/PB-211 cartridge | Isolates chip vs printer body | 1–2 min |
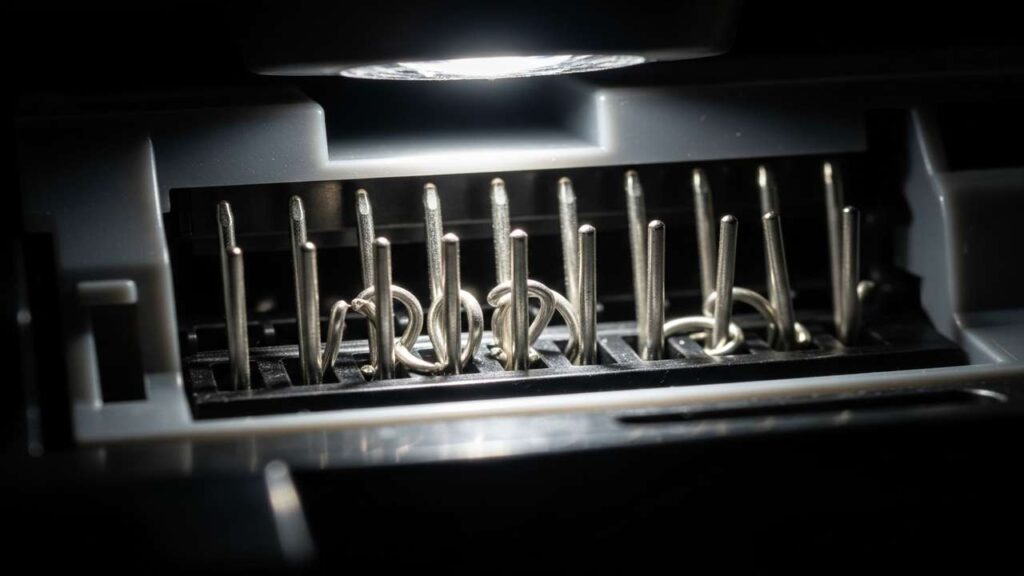
| 6 | Check pin spring action with a flashlight | Stuck/collapsed pin = contact block service | 2 min |
| 7 | Disable auto-firmware updates temporarily | Prevents surprise chip rejections | 1 min |
| 8 | If needed, install a firmware-compatible reset chip | Matches ID to your current build | 3–5 min |
| 9 | Re-add printer by TCP/IP; remove duplicate queues | Stops driver re-poll loops | 2–3 min |
| 10 | Print Supplies/Status + a one-page PDF | Verifies stable detection under load | 1–2 min |
Deep checks most people skip
Spring pins: Each pin should stand proud and spring back when pressed. A stuck or short pin won’t reach the chip.
Door & latch pressure: If the front cover isn’t squarely closed, the chip can float off the pins. Adjust hinges/latches and re-test.
Debris & label glue: Dust under the cartridge nose lifts it off the contact block; clean gently.
Choosing and installing a reset chip
Match the cartridge series (PB-210/PB-211 and the exact sub-variant used in your region).
If the fault started after new firmware, pick a reset chip that explicitly lists your firmware family.
Handle chips by the edges (avoid touching metal pads).
After installation, print a Supplies/Status page to confirm the level resets and the ID is accepted.
Firmware & driver hygiene (prevents phantom rechecks)
Firmware: Turn automatic updates OFF while testing. If recognition failed immediately after updating, re-apply the same build to clear a partial install or roll back if your model allows.
Driver/queues: Remove duplicate queues and re-add the printer by TCP/IP (fixed IP). Keep one model-correct driver (PCL/PS/IPP-Everywhere).
If it still says “toner not detected”
Accepts only the known-good cartridge: your original chip or shell tolerances are the culprit—install a fresh reset chip and reseat.
Rejects every cartridge: contact block or wiring issue; inspect for collapsed pins and service the assembly.
Works after restart, fails mid-job: borderline contact or driver re-poll; improve seating and standardize the driver/port.
After refill: Refilling restores powder, not identity. You still need the correct reset chip.
Prevent the comeback
Keep one labeled known-good cartridge for instant A/B tests.
Clean contacts during every change—10 seconds prevents hours of downtime.
Run printers LAN-only if you rely on third-party chips; update manually on your schedule.
Store toner sealed and upright; avoid hot/humid shelves that oxidize contacts.
FAQs
Can cleaning really fix identity errors?
Yes—oxidized pads and dusty pins are top causes.
Do I need a chip after every refill?
Usually, yes. Refilling adds toner, not a new identity.
Why disable updates?
To avoid mid-project changes that tighten validation before you’ve tested chips against the new firmware.
Pages print but popups still complain.
Remove duplicate queues and keep only the TCP/IP one; stale WSD queues often misreport supplies.
Conclusion
A dependable fix for pantum m6550nw toner not detected comes down to clean contact, correct chip, and stable firmware/driver. Work through the table in order and your M6550NW will detect cartridges consistently—no more surprise lockouts mid-print.