
Ultimate Ricoh SC551 Fuser Error Fix Guide
Get your printer working again with clear, actionable steps to diagnose and resolve this common fuser heating failure.
- Error Meaning: Your printer’s fuser unit is not reaching the required operational temperature in the allotted time.
- Common Causes: A faulty thermistor, a tripped thermostat, a poor fuser connection, or a failing heating lamp.
- Solution Path: Start with a simple reset, then move to physical checks and component testing before replacing parts.
A Ricoh SC551 fuser error fix is required when your machine’s control panel displays this critical code, halting all print operations. This error indicates a problem within the fuser unit, the component responsible for melting toner onto paper. While it sounds severe, you can often resolve it with a systematic troubleshooting approach, saving you the cost and delay of a service call. This guide will walk you through the entire process, from quick resets to component-level diagnostics.
Table of Contents
- What Causes the SC551 Fuser Error?
- Initial Troubleshooting Steps
- Advanced Ricoh SC551 Fuser Error Fix Methods
- Troubleshooting Summary Table
- When Replacement is the Only Option
What Causes the SC551 Fuser Error?
The SC551 code is specific to the fuser’s heating circuit. When you turn the printer on or send a print job, the main board expects the fuser’s thermistor to report a rapid temperature increase. If this target temperature isn’t reached within a set time, the machine flags the SC551 error to prevent damage.
The primary culprits behind this failure are almost always located within the fuser assembly itself:
- Faulty Thermistor: This sensor measures the fuser roller’s temperature. If it’s damaged or dirty, it can send incorrect readings, tricking the machine into thinking it’s not heating up.
- Tripped or Bad Thermostats: These are safety switches that cut power if the temperature gets too high. They can fail in the “open” position, preventing the fuser from ever getting power.
- Burned-out Fuser Lamp: The halogen lamp inside the roller is the heat source. Like any bulb, it can burn out and will no longer heat the unit.
- Poor Electrical Connection: The fuser unit connects to the printer’s main power supply. If this connection becomes loose or corroded, it can cause intermittent power failure.
Initial Troubleshooting Steps
Before diving into advanced procedures, perform these simple checks. Always begin with safety in mind. Unplug the printer from the wall outlet and allow it to cool for at least 30 minutes, as fuser units operate at extremely high temperatures.
First, perform a full power cycle. Turn the machine off using the main power switch, wait a full minute, and then turn it back on. This can sometimes clear a temporary electronic glitch that falsely triggered the error code. If the error returns immediately, the next step is to reseat the fuser unit to ensure it has a solid electrical connection.
Advanced Ricoh SC551 Fuser Error Fix Methods
If the initial steps didn’t work, you’ll need to dig deeper. The following methods involve entering the printer’s service mode and potentially testing components with a multimeter.
Resetting the Error Code in Service Mode (SP Mode)
Ricoh printers log error codes, and sometimes this log must be cleared manually even after the underlying issue is resolved. This is a critical step in any ricoh sc551 fuser error fix.
- Press the Reset key (yellow button).
- Quickly type 806182 on the numeric keypad.
- Hold down the C (clear) key until the Service Program (SP) menu appears.
- Navigate to System SP.
- Find SP code 5810 and press it.
- Select option 1 Fuser SC Reset and press Execute.
- Turn the machine off and then back on.
If the error disappears, you may have fixed it. If it returns, the hardware is at fault and needs to be tested.
Testing Thermistors and Thermostats
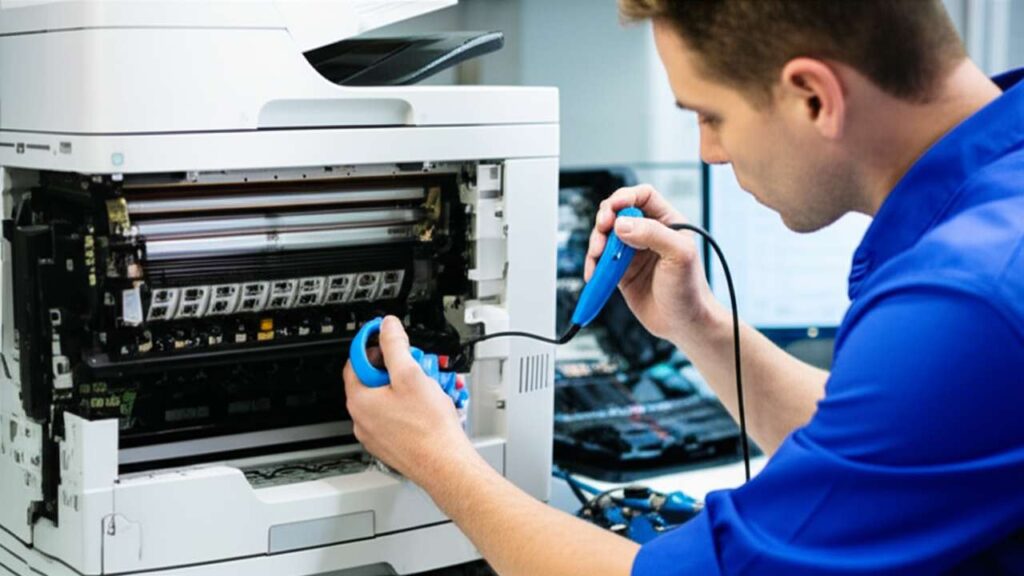
This step provides the most definitive ricoh sc551 fuser error fix by identifying the exact failed part. You will need a multimeter set to measure continuity or resistance. With the fuser removed, locate the thermistors and thermostats. Test each one by placing your multimeter probes on its two contacts.
A healthy component will show a closed circuit (continuity beep or a low resistance reading). If your meter reads “OL” (Open Line) or infinite resistance, that component has failed and must be replaced. Learning about checking fuser unit components is a valuable skill for any technician.

Troubleshooting Summary Table
| Step | Action | Why it helps | Time |
|---|---|---|---|
| 1 | Full Power Cycle | Clears temporary system glitches and resets sensors. | 2 mins |
| 2 | Reseat Fuser Unit | Re-establishes a secure physical and electrical connection. | 10 mins |
| 3 | Reset Error in SP Mode | Clears the error code from the printer’s memory log. | 5 mins |
| 4 | Test Components | Uses a multimeter to identify a broken thermistor or thermostat. | 20 mins |
When Replacement is the Only Option
If you have performed the SP mode reset and component testing reveals a bad thermostat or thermistor, your path is clear. While replacing individual parts is possible, the most reliable and often simplest solution is to replace the entire fuser maintenance kit. This ensures all related wear-and-tear components are new, providing greater long-term reliability. A complete assembly is the most robust ricoh sc551 fuser error fix.
Successfully diagnosing and clearing this error code is a rewarding process. By following these steps, you can confidently address the root cause, whether it’s a simple software glitch or a failed hardware component. Completing a ricoh sc551 fuser error fix yourself gets your machine back online quickly and efficiently.