

Proven Epson 031006 Error Fix: A Definitive Guide
Introduction
The epson 031006 error fix involves diagnosing a critical communication breakdown between your printer’s mainboard and the print head. This error code signifies that the mainboard cannot detect or properly communicate with the print head, halting all printing operations. Common causes include a damaged or improperly seated FFC (Flat Flexible Cable) ribbon, moisture shorting out contacts, a blown fuse on the mainboard (often labeled F1), or a fundamentally faulty print head. This guide will walk you through a systematic approach to troubleshoot and resolve this issue.
- Tools & Parts
- Timing
- Step-by-Step Instructions
- Technical Profile & Risk
- Safer Alternatives & No-Parts Fixes
- Deployment & Testing
- Common Mistakes to Avoid
- Storage, Backups & Maintenance
- Conclusion
- FAQs
Tools & Parts
Before you begin, gather the necessary tools to ensure a smooth and safe repair process. Working without the proper equipment can lead to further damage.
- Screwdriver Set: A set of small Phillips head screwdrivers is essential for removing the printer casing.
- Plastic Pry Tools: To safely open the casing without scratching or breaking plastic clips.
- Multimeter: Required for advanced diagnostics to test the mainboard fuse for continuity.
- Lint-Free Cloths: For cleaning electrical contacts without leaving fibers behind.
- Isopropyl Alcohol (90%+): An effective solvent for cleaning contacts on the FFC ribbon and mainboard.
- Anti-Static Wrist Strap: Highly recommended to prevent electrostatic discharge from damaging sensitive electronics.
- Magnifying Glass or Loupe: Helpful for inspecting the tiny pins on the FFC ribbon and connectors for damage.
Timing
The time required can vary significantly based on your technical skill and the root cause of the problem. A simple power reset takes minutes, while a full disassembly to inspect cables and test the mainboard can take one to two hours. If parts like a new FFC cable or mainboard are needed, factor in additional time for ordering and installation. Allocate at least 90 minutes for a thorough initial diagnosis.
Step-by-Step Instructions
Follow these steps in order, starting with the least invasive solutions first. Do not proceed to advanced steps unless you are comfortable working with delicate electronic components. Always unplug the printer from its power source before opening the casing.
Step 1: Power Cycle and Basic Reset
First, perform a complete power reset. Unplug the printer from the wall outlet and disconnect the power cord from the printer itself. Wait for at least five minutes to allow all residual charge in the capacitors to dissipate. This can sometimes clear transient electronic glitches. Reconnect the power cord and turn the printer on to see if the error has cleared.
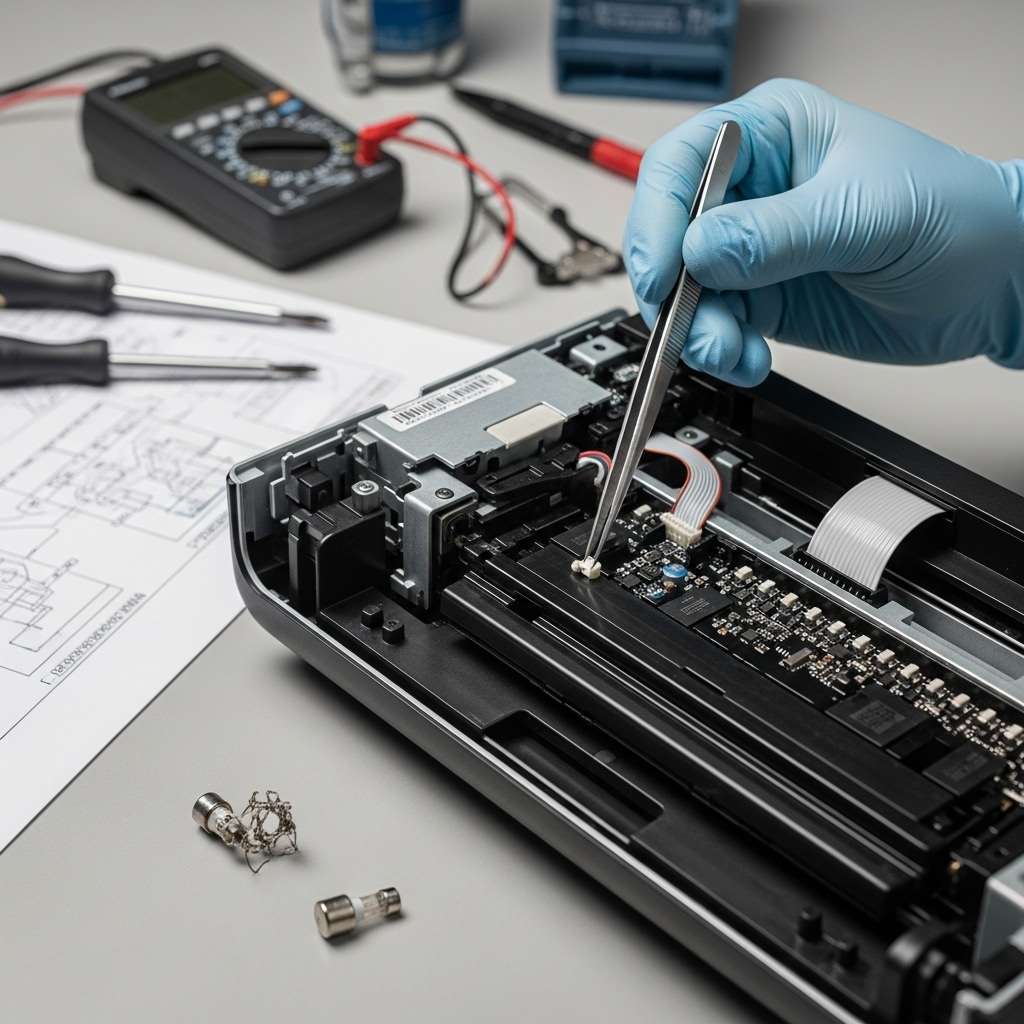
Step 2: Visually Inspect the FFC Ribbon for a Quick epson 031006 error fix
If the reset fails, the next step is to inspect the FFC ribbon cable connecting the print head to the mainboard. Power down and unplug the printer. Carefully open the printer casing to access the print head carriage and mainboard. Look closely at the white ribbon cable for any signs of physical damage, such as creases, tears, or burnt marks on the blue ends. Ensure both ends are fully and squarely seated in their respective connectors.
Step 3: Check for Moisture and Clean Contacts
Moisture is a primary enemy of printer electronics. Even a small amount of spilled ink or cleaning solution can cause a short. Disconnect the FFC ribbon cable from both the print head and the mainboard. Inspect the gold contacts on the cable and the pins inside the connectors for any signs of corrosion or liquid. Lightly dampen a lint-free cloth with isopropyl alcohol and gently wipe the contacts on both ends of the FFC ribbon to remove any residue. Let it air dry completely before reconnecting.
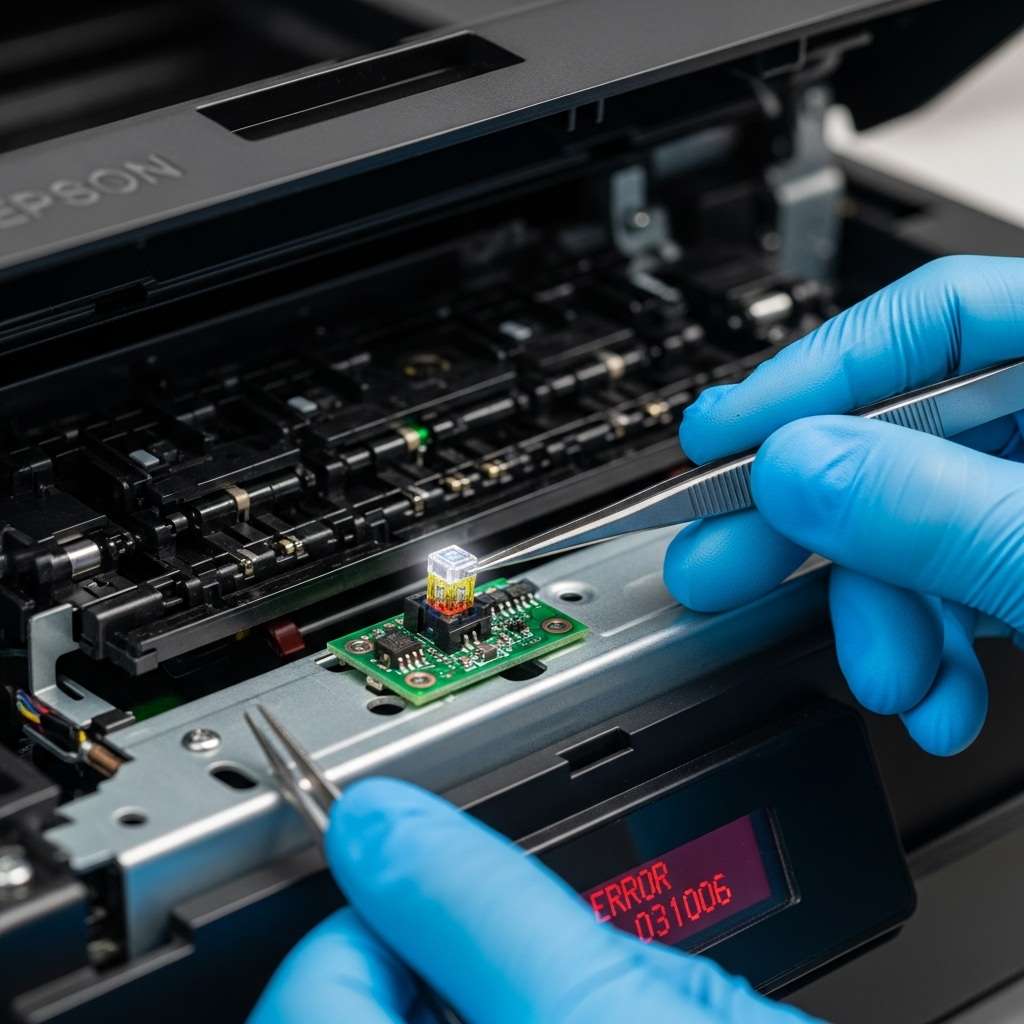
Step 4: Advanced Mainboard Diagnostics for the Epson 031006 Error Fix
This step is for advanced users only. With the printer unplugged, locate the mainboard. Look for a small component often labeled “F1” or “F2″—this is a surface-mount fuse. Set your multimeter to the continuity test mode (it usually has a sound icon). Touch the probes to either side of the fuse. If you hear a beep, the fuse is intact. If there is no beep, the fuse has blown, which is a strong indicator of a shorted print head or a power surge. Replacing a surface-mount fuse requires soldering skills.
| Step | Action | Why it helps | Time |
|---|---|---|---|
| 1 | Perform a full power cycle (unplug for 5+ minutes). | Resets the printer’s internal memory and can clear temporary electronic faults. | 5-10 min |
| 2 | Open casing and inspect the FFC ribbon cable for damage or misalignment. | A damaged cable is a common cause of communication failure between components. | 20-30 min |
| 3 | Disconnect and clean FFC cable contacts with isopropyl alcohol. | Removes dirt, ink, or moisture that could be causing a short or poor connection. | 15-20 min |
| 4 | Use a multimeter to test the mainboard fuse (F1/F2) for continuity. | Confirms if the mainboard’s protective fuse has blown, indicating a deeper issue. | 30-45 min |
Technical Profile & Risk for the epson 031006 error fix
This repair ranges from low to high risk. A power reset is risk-free. Opening the printer introduces moderate risk; you could break plastic tabs or fail to reassemble it correctly. The highest risk involves handling the mainboard and FFC cable. Static electricity can permanently destroy the mainboard or print head. Incorrectly inserting the FFC cable or shorting a connection while testing can cause irreparable damage. Proceed with extreme caution.
Safer Alternatives & No-Parts Fixes
Before disassembling your printer, exhaust all non-invasive options. A proper power reset is the easiest first step. Next, check for any available firmware updates for your printer model, as these can sometimes patch software bugs that may trigger false error codes. You can also try reinstalling the printer driver on your computer. While less likely to solve a hardware communication error, it eliminates software conflicts as a potential cause. These steps require no tools and carry zero risk of damaging the hardware, making them an essential starting point for any epson 031006 error fix attempt.
Deployment & Testing
After performing any physical repairs, such as reseating the FFC cable or cleaning contacts, reassemble the printer casing carefully. Ensure all screws are returned to their original locations and that no wires are pinched. Plug the printer in and turn it on. Observe the startup sequence. If the printer initializes without displaying the 031006 error, the fix was likely successful. Print a nozzle check pattern from the printer’s maintenance menu to confirm that the print head is functioning correctly.
Common Mistakes to Avoid
Many users inadvertently cause more damage during a repair attempt. Here are critical mistakes to avoid:
- Forgetting to Unplug: Never work on internal components with the power connected.
- Using Force: Plastic clips and connectors are fragile. Do not force them; if something is stuck, find the release mechanism.
- Ignoring Static: Not using an anti-static wrist strap can lead to frying the mainboard with an invisible spark.
- Improper Cleaning: Using water or household cleaners on electronics will cause corrosion and shorts. Stick to 90%+ isopropyl alcohol.
- Incorrect Reassembly: Pinching the FFC ribbon during reassembly can damage it and immediately recreate the error.
Storage, Backups & Maintenance
To prevent future electronic failures, keep your printer in a dry, stable environment away from extreme temperatures and humidity. Regular cleaning to remove paper dust and ink residue can prevent buildup that might interfere with components. This type of care should be part of a regular proper printer maintenance routine. If you use custom print profiles, back them up before performing any firmware updates or driver reinstalls.
FAQs
What is the most common cause of the epson 031006 error fix being needed?
The most frequent cause is a faulty connection or damage to the FFC ribbon cable that links the print head to the mainboard. This can happen from mechanical wear, improper installation, or moisture damage.
Can a faulty ink cartridge cause the 031006 error?
It is highly unlikely. This error code points specifically to a communication problem with the print head itself or its connection to the mainboard, not with the ink supply system.
Is it worth repairing a blown fuse on the mainboard?
It depends. If the fuse blew due to a random power surge, a replacement might fix it. However, a blown fuse is often a symptom of a shorted, failing print head. Replacing the fuse without replacing the faulty print head will likely result in the new fuse blowing immediately.
Conclusion
Resolving the Epson 031006 error requires a methodical troubleshooting process. By starting with simple resets and progressing to careful inspection of internal components like the FFC ribbon, you can often identify and correct the fault. For advanced issues like a blown mainboard fuse, professional service may be the safest option. Always prioritize safety by working with the power disconnected and protecting sensitive electronics from static discharge. For a comprehensive walkthrough, see our premier epson 031006 error fix guide.