
Struggling with a Reset Samsung CLP-510 Toner warning that has stopped you from printing, even when you know there’s toner left in the cartridge?1 This common and frustrating issue is not a technical fault; it is a deliberate design choice by the manufacturer. The printer is not intelligently measuring the actual toner powder. Instead, it is reading a “page counter” from a small electronic chip on the cartridge.2 Once that counter hits a pre-set limit, the printer locks you out. This expert guide provides every known method to bypass this counter, from simple, free tricks 4 to permanent hardware and software solutions.2 This report will walk through all verified methods, step-by-step.
Understanding the “Replace Toner” Warning: The Chip at the Heart of the Problem
The core issue stems from what some sources describe as “lousy business practices” 3 or “Built-in Obsolescence”.7 The system is designed to force the purchase of expensive new cartridges, even when the existing one could be refilled and reused perfectly.3
The Culprit: Your Toner’s 24C04WP EEPROM Chip
On the side of your Samsung CLP-510 toner cartridge is a small circuit board.3 The single component responsible for your “Replace Toner” message is a chip identified as the ST Microelectronics 24C04WP.3
This component is a 4 Kbit Serial $I^2C$ Bus EEPROM (Electrically Erasable Programmable Read-Only Memory).2 Its sole purpose is to function as a “build-in page counter”.3 The printer writes to this chip with every page printed. When the pre-programmed page limit (e.g., 7,000 pages for black, 5,000 for color) is reached, the printer’s firmware reads this “empty” status and stops all printing operations.2 This occurs regardless of the actual amount of toner powder remaining in the cartridge.
Critical Distinction: Toner Chip vs. Drum Unit Chip
A common point of confusion that can lead to applying the wrong fix is the difference between the toner cartridge and the imaging (drum) unit.
- Toner Cartridge (e.g., CLP-510D7K): This component holds the colored powder. It uses the 24C04WP EEPROM chip to store page count data.3 The methods in this guide are for the “Replace Toner” message associated with this part.
- Imaging Unit (Drum Unit): This is a separate, large component that transfers the image to the paper. When the printer shows a “Replace with new imaging unit message” 7, it is referring to this. The drum’s “chip” is a completely different, much simpler technology. It is not an EEPROM but a set of resistors (e.g., a 200k ohm and a 56 ohm resistor).8 The printer sends a current that blows the 56 ohm resistor like a fuse.8 This signals to the printer that a “new” unit is installed, and the printer then starts its own internal page count.8
The methods described below are for resetting the toner cartridge chip, not the drum unit.
Comparison of All 4 Reset Methods: Which is Right for You?
Different users require different solutions based on technical skill, cost, and desired permanence. The following table compares all known methods to help you choose the best path.
| Method | Difficulty | Cost | Tools Required | Permanence |
| 1. Tape Trick (Consumable Mode) | Non-Technical | Free | Electrical Tape | Persistent Bypass |
| 2. Physical Chip Replacement | Medium | $ (Chip Cost) | Soldering Iron | Permanent Reset |
| 3. Chipless Firmware | Low | $$ (Service Cost) | Computer | Permanent Bypass |
| 4. PonyProg (Serial Port) | Expert | $ (Parts Cost) | PC with Serial Port, SI-Prog Interface | Permanent Reset |
Method 1: The Easy “Tape Trick” (Uncheck Consumable Mode)
This is the most accessible, non-invasive, and free solution. It does not technically reset the chip; rather, it blinds the printer to the chip’s “empty” status by covering the contacts and then uses a hidden service menu to tell the printer’s firmware to stop checking.4
Step-by-Step Guide to Enable “Uncheck Consumable Mode”
This is a consolidated set of instructions verified from multiple sources.1
- Turn the Samsung CLP-510 printer’s main power switch off.
- Open the left cover (the one used to access the toner cartridges).10
- Remove the toner cartridge that the printer is reporting as empty.
- Locate the three small, parallel metal contacts on the side of the cartridge. Cut a small piece of electrical tape and place it so it completely covers all three contacts.4
- Firmly reinstall the taped cartridge back into the printer.4 Close the cover.
- Press and hold the “Menu” button on the printer’s control panel.4
- While still holding the “Menu” button, turn the printer’s main power switch back on.4
- Continue to hold the “Menu” button for 5 to 10 seconds. The printer’s display should show a service menu message, such as “uncheck consumable mode appears”.4
- Once this message appears, release the “Menu” button.
The printer will initialize itself and should now work fine. The “No more replace toner messages” should be gone, as the printer has been instructed to ignore the status of the (now-covered) chip.4
How This Works & Is It Permanent?
The tape physically prevents the printer from reading the “empty” status from the EEPROM. The “uncheck consumable mode” is a hidden service setting that tells the printer’s firmware to stop polling for consumable status. This setting is persistent, meaning it should remain active even after you turn the printer off and on again.
Method 2: Physical Chip Replacement (The Hardware Fix)
This is the most common method used by professional toner remanufacturers. It involves physically desoldering the old 24C04WP chip and replacing it with a new, third-party “smartchip” that comes with a fresh, zeroed-out page count.
Tools and Materials Required
To perform this method, you will need the following 6:
- A replacement Reset Samsung CLP-510 Toner chip (specific to your cartridge model and color).
- A soldering iron and wire solder.
- A small Phillips-head screwdriver.
- A small flat-head screwdriver or prying tool.
Where to Buy a Replacement Chip
You will be purchasing a third-party compatible “smartchip” or “reset chip,” not an official Samsung part.12 These are widely available from various online vendors:
- Marketplaces: eBay 3 and AliExpress 15 list many options.
- Specialized Vendors: Stores like Uninet Imaging 6, PrintChip 12, LaserTek Services 16, and Copier Bazar 17 sell chips specifically for remanufacturing.
Important: You must buy the correct chip. The black cartridge (CLP-510D7K) has a 7,000-page yield, while the color cartridges (CLP-510D5C, D5M, D5Y) have 5,000-page yields.3 The replacement chip must match.
Complete Guide: Desoldering and Installing the New Chip
This technical walkthrough is based on standard remanufacturing instructions.6
- Place the toner cartridge on a clean, static-free workspace.
- Remove the five screws that hold the outer shell: four are located on the top of the cartridge, and a fifth is on the gear side.6
- Press the side tabs to release the outer shell and remove it.11
- Locate the cartridge contacts assembly. This is the small board you can see from the outside, which contains the three metal contacts.
- Using a small flat-head screwdriver, carefully pry this assembly loose and remove it from the cartridge body.6
- The Critical Step: Using a heated soldering iron, carefully desolder the original 24C04WP chip from the connector board. Avoid overheating the board, as this can damage the contacts.6
- Clean the contact pads on the board. Place the new replacement chip in the exact same position and orientation as the old one.6
- Using the soldering iron, solder the pins of the new chip to the connector board.6
- Reinstall the contacts assembly back into the cartridge, then replace the outer shell and the five screws.
CRITICAL WARNING: You must ensure the cartridge is refilled with toner at the same time you install the new chip. If you install a new chip on a cartridge that is physically empty, the printer may immediately register it as “useless” or empty, wasting the chip.12
Method 3: Chipless Firmware (The Permanent Software Fix)
This is a modern, software-only solution for users who want a permanent fix without opening the cartridge or using a soldering iron. This method involves modifying the printer’s firmware, not the cartridge’s chip.
How Chipless Firmware Works
This is a third-party, paid modification that patches the printer’s internal software.5
- Mechanism: The custom firmware instructs the printer to permanently disable its function for monitoring toner chips.5
- Result: The printer is tricked into always displaying a 100% toner level for all cartridges.5 This allows you to print “forever,” or more accurately, until you physically run out of toner powder and notice the print quality fading.5
- Key Benefit: This method solves one of the CLP-510’s most frustrating limitations. A standard CLP-510 will stop you from printing in black-and-white if a color cartridge is declared “empty.” Chipless firmware bypasses this, allowing you to print in monochrome even if the color cartridges are empty.5

Where to Get This Firmware
This service is offered by online providers like inkchip.net.5 The process typically involves purchasing the firmware patch specific to your printer model, which is then applied to your printer by connecting it to a computer.
- Pros: It is a permanent fix. No hardware skills are needed. It adds new functionality (B&W printing override).
- Cons: It is a paid service. It involves flashing third-party firmware, which carries a very small intrinsic risk.
Method 4: Advanced Reprogramming with PonyProg (The Expert Fix)
This is the classic, most powerful method for those with electronics experience. It involves directly connecting to the 24C04WP EEPROM chip and using the PonyProg software to manually rewrite the page counter data.
This method requires legacy hardware, as PonyProg was designed to communicate over a DB9 serial port, not USB. While USB-to-Serial adapters exist, they are notoriously unreliable for this type of direct hardware programming and often fail.
Hardware and Software Requirements
- Software: The PonyProg serial device programmer software.
- PC: A computer with a physical DB9 serial port.
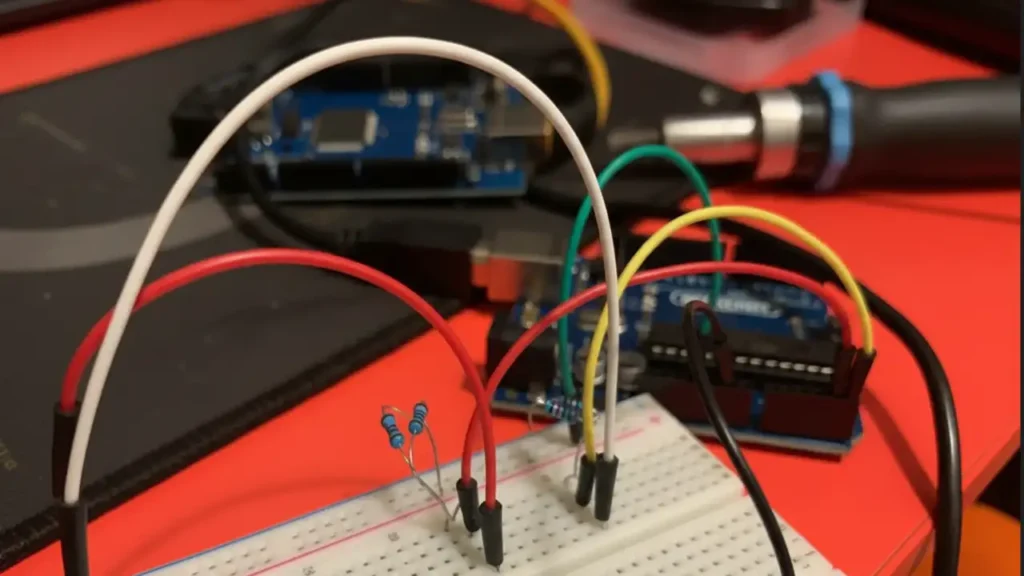
- Interface: A hardware interface to connect the serial port to the
$I^2C$chip. The official, time-tested interface is the SI-Prog. - Adapter: A specific I²C Bus EEPROM adapter for the SI-Prog to connect to 24Cxx-family chips. You will likely need to build this small circuit yourself.
Step-by-Step Guide to Resetting with PonyProg
- Build Your Hardware: You must first build or acquire the SI-Prog interface and the 24Cxx I²C adapter.18
- Connect the Hardware:
- Connect the SI-Prog interface to your PC’s DB9 serial port.
- Connect your I²C adapter to the SI-Prog base board.
- Carefully connect the three contacts from the toner cartridge chip (SDA, SCL, and GND) to the correct pins on your I²C adapter.
- Configure PonyProg Software:
- Launch the PonyProg software.
- Go to the menu and select
Setup > Interface Setup.... - In the window, select
SerialandSI Prog I/O. - Choose the correct port your interface is on (e.g.,
COM1). - Click the “Probe” button. If your hardware is connected correctly, you should see a “Test OK” message.
- Select the Chip:
- From the main device menu, select
I²C Bus EEPROMand then choose24C04from the list.
- From the main device menu, select
- Read and Backup the Chip (CRITICAL):
- Click the “Read All” button on the toolbar (or select
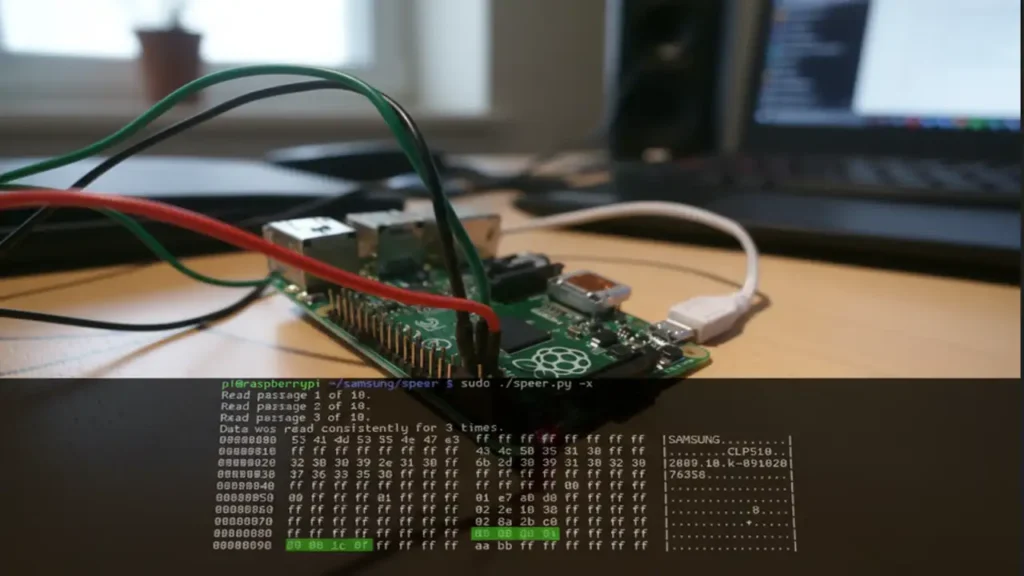
Command > Read All). - The main window will fill with the hexadecimal data from your “empty” chip.
- Immediately back up this data. Go to
File > Save Data (EEPROM) File...and save the.binfile. If you make a mistake, this backup is the only way to restore your chip.
- Click the “Read All” button on the toolbar (or select
- Edit the Page Counter:
- In the PonyProg hex editor, scroll down to the data at address
0x88. - This location, along with the bytes at address
0x90, functions as the page counter. - Manually change the values in these locations to zero (e.g.,
00).
- In the PonyProg hex editor, scroll down to the data at address
- Write the Data Back:
- Click the “Write All” button (or select
Command > Write All). - PonyProg will ask for confirmation. Click “Yes” to write your modified (zeroed) data back onto the 24C04WP chip.
- Click the “Write All” button (or select
- Verify the Write:
- Once the write is complete, click “Read All” again.
- Check the data at addresses
0x88and0x90. They should now read00, confirming the reset was successful.
You can now reinstall the cartridge. The printer will read the zeroed-out counter and recognize it as a brand new, 100% full cartridge.
Frequently Asked Questions
Final Recommendations: The Best Reset Samsung CLP-510 Toner Method for You
- For the Non-Technical Home User: Start and end with Method 1: The Tape Trick.4 It is free, fast, and highly effective for bypassing the “Replace Toner” warning.
- For the “Set it and Forget it” User (Home or Office): The best long-term solution is Method 3: Chipless Firmware.5 It is a one-time purchase that permanently solves the problem on the printer itself and even adds the ability to print B&W when color cartridges are empty.
- For the DIY Repair Enthusiast: If you are comfortable with a soldering iron, Method 2: Physical Chip Replacement 6 is the classic, reliable, and industry-standard hardware solution.
- For the Electronics Hobbyist: If you have experience with electronics and access to a PC with a serial port, Method 4: The PonyProg Method gives you complete, reusable control over your hardware. It is a classic, powerful solution for the dedicated hobbyist.
Download Link
Ponyprog Resetter Download