How to Manually Add Laser Printer Mac by IP Address
If your network printer is no longer visible or accessible on your Apple computer, you may need to manually add laser printer Mac using its specific network address. This guide provides a detailed walkthrough for re-establishing the connection by directly inputting the printer’s IP details into your system settings, especially when automatic network discovery fails. This process is essential for ensuring your device can communicate with the printer.
Before You Manually Add Laser Printer Mac: Locate the IP Address
To successfully connect your mac printer by ip address, you must first identify its unique network identifier. This is a critical first step, as the IP address acts as the direct pathway for your Mac to locate the printer on your local network. A common reason for a printer not showing on mac is an unknown or changed IP.
- Obtain the IP Address: Access the printer’s control panel or menu. Navigate through its settings to find an option to print a network configuration page or a network status report. This document will typically list the current IP address, which usually appears in a format such as 192.168.1.x. Retain this information as it is essential for the setup process that follows.
Steps to Manually Add Laser Printer Mac Through System Settings
Once you have secured the printer’s network address, you can proceed with the installation on your macOS device. This procedure involves navigating through the system preferences to incorporate the printing hardware. This method effectively shows how to add printer to mac when it is not showing up in the default lists.
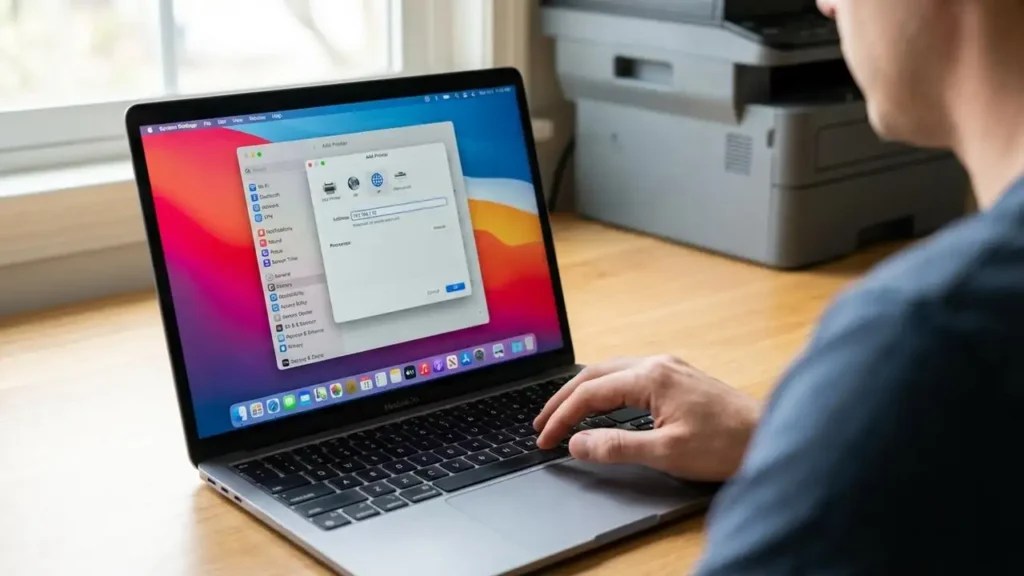
- Open System Settings: Click on the Apple menu located in the top-left corner of your desktop. From the dropdown menu, select “System Settings” (or “System Preferences” on older macOS versions).
- Access Printers & Scanners: Within the System Settings window, scroll down or use the search bar to locate and click on “Printers & Scanners.” This dedicated section manages all printing devices currently configured or available for your computer.
- Initiate Add Printer: Look for and click the “+” (Add) button. This action typically opens a new dialogue box, allowing you to choose the method for adding a new device. The option may also be labeled “Add Printer, Scanner, or Fax.”
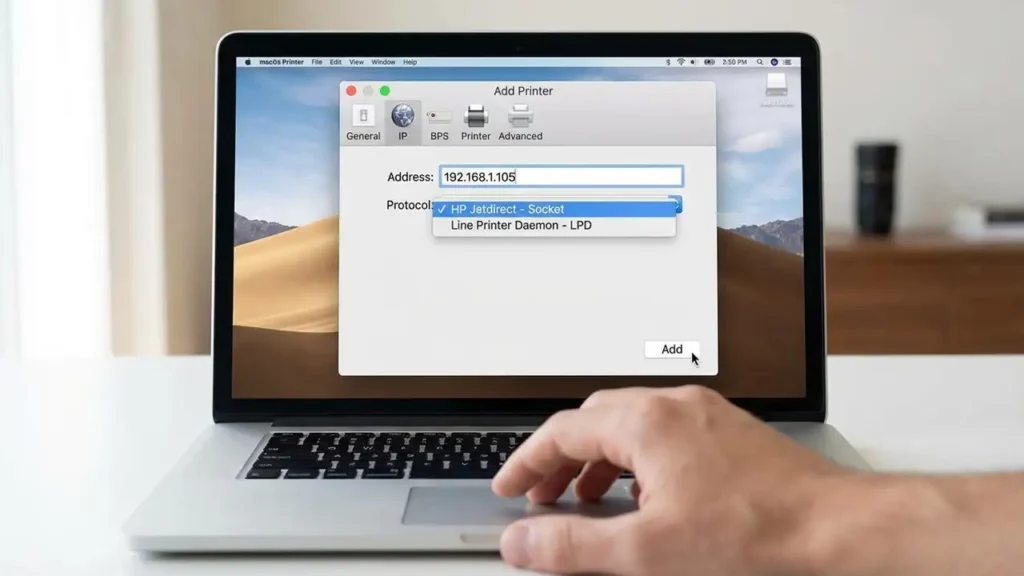
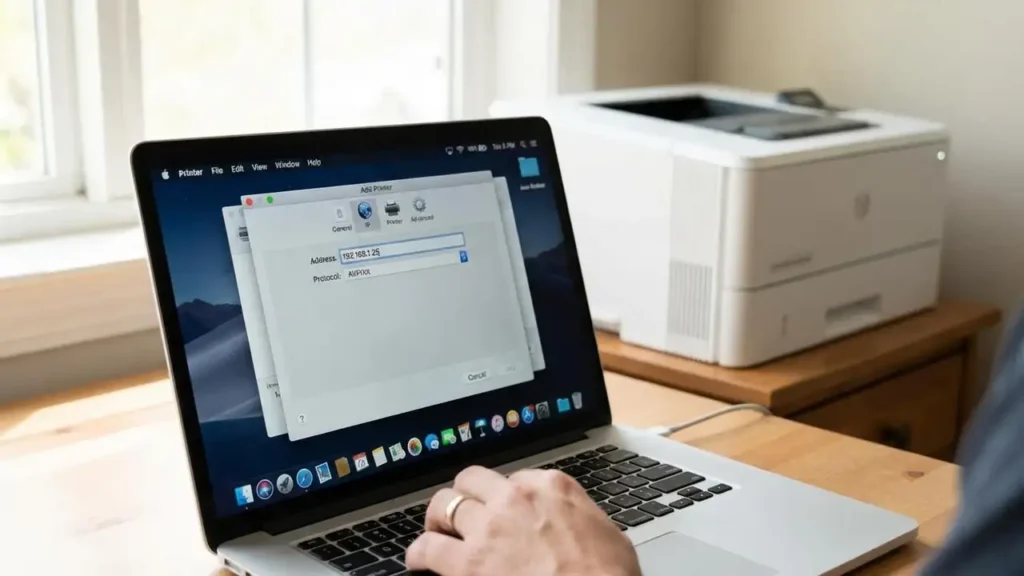
- Choose IP Option: In the new window, click the “IP” tab. This tab is often represented by a small globe icon. Selecting this option instructs your system to attempt a connection to a specific network address rather than scanning for available devices.
- Enter Connection Details: Carefully input the required information to establish the connection:
- Address: Type the IP address you obtained from your printer’s network configuration page into this field. Accuracy is vital for the connection.
- Protocol: From the provided dropdown menu, you must select the appropriate communication protocol. Choose either “Line Printer Daemon – LPD” or “HP Jetdirect – Socket.” The correct selection often depends on the specific manufacturer and model of your laser printer.
- Queue: For most standard setups, you can leave this field blank. Only enter a queue name if your network administrator or the printer’s documentation specifically instructs you to do so.
- Name: Assign a recognizable name to your printer. This name will be displayed in your list of available printers, making it easy to identify.
- Use: Select the correct driver software for your printer. If your printer supports it, “AirPrint” is often a convenient option that uses built-in macOS capabilities. Otherwise, choose specific software if a compatible driver has already been installed on your Mac.
- Finalize Addition: After entering all the necessary details, click the “Add” button. Your Mac will then attempt to establish a connection with the laser printer using the provided IP address and driver information. If successful, the printer will appear in your Printers & Scanners list.
Selecting the Correct Protocol and Driver for Your Manually Add Laser Printer Mac Connection
Choosing the appropriate protocol (Line Printer Daemon – LPD or HP Jetdirect – Socket) and driver (such as AirPrint or specific vendor software) is a critical step for the manually add laser printer Mac procedure. An incorrect selection in either of these fields can prevent your computer from properly communicating with the printing device, leading to connection failures. Always prioritize the most compatible option for a reliable and functional setup, often guided by your printer’s brand or available macOS drivers.
Troubleshooting After Attempting to Manually Add Laser Printer Mac
Even after performing the steps to manually add laser printer Mac, you might encounter situations where the connection isn’t immediately stable, or printing doesn’t initiate as expected. This section outlines key troubleshooting steps to resolve common issues. This is crucial if your printer does not appear in printers and scanners even after setup.
- Restart Devices: As a first troubleshooting step, restart both your laser printer and your Mac computer. A simple reboot can often clear temporary network glitches, refresh network connections, and resolve minor software conflicts that might be preventing communication.
- Verify Network Connection: Ensure that both your Mac and the laser printer are actively connected to the same Wi-Fi network. Discrepancies in network connectivity, such as one device being on a guest network and the other on the main network, will prevent them from communicating with each other. This is a common reason you might need to reconnect network printer mac.
- Configure Static IP: If your printer’s network address changes frequently (a common occurrence with dynamically assigned IPs), consider configuring a static IP address directly on the printer itself. This prevents future disconnection issues caused by the IP address renewing or changing, eliminating the need to repeatedly manually add laser printer Mac. Consult your printer’s manual for instructions on setting a static IP.
By following these comprehensive steps, you can successfully manually add laser printer Mac by its IP address, restoring its functionality and ensuring reliable printing. Remember to keep a record of your printer’s IP address and consider configuring it with a static IP to maintain a stable connection, thus avoiding future interruptions and the need for repeated setup. This robust approach helps how to connect macbook to printer wirelessly using a fixed network address.