
Print Head Alignment Failed: Fix Error Code 2500
Troubleshoot and resolve common print head alignment issues, including specific error codes like 2500, for sharp and accurate prints.
When your printer stubbornly displays a “Print Head Alignment Failed” message, often accompanied by cryptic error codes like 2500 for Canon printers or similar alerts on HP models, it can be a deeply frustrating experience. This error signifies that the printer’s internal system can no longer accurately place ink or toner dots on the paper, leading to fuzzy text, misaligned colors, or general poor print quality. While automatic print head alignment failures are common, understanding the underlying causes and knowing how to perform both automatic and manual fixes can restore your printer to its optimal performance.
This guide will walk you through the most frequent reasons for print head alignment failed messages and provide clear, actionable steps to resolve them. We’ll cover simple checks, software solutions, and manual interventions that can help get your printer producing sharp, professional-looking documents again. Whether you’re dealing with an HP printhead alignment not working or a Canon support code 2500, the principles are largely the same.
Understanding Print Head Alignment
Print head alignment is a critical calibration process where your printer ensures that the print heads (the part that sprays ink or places toner onto the paper) are perfectly positioned. This precise alignment is crucial for creating sharp lines, accurate colors, and readable text. If the alignment is off, you’ll see symptoms like blurry images, double vision on text, or colors bleeding into each other. An automatic print head alignment error means the printer’s built-in sensors and software couldn’t complete this calibration successfully.
Common Causes for Alignment Failure
Several factors can lead to your printer failing its alignment checks. Often, the issue isn’t a hardware defect but something simpler. Clogged ink nozzles are a prime suspect for inkjet printers, as dried ink can disrupt the precise spray pattern. For both inkjet and laser printers, using the wrong type or weight of paper can confuse the alignment sensors. Ensure you’re using plain paper of the recommended specifications for your printer model.
Low ink or toner levels can also sometimes trigger alignment problems, as the printer may struggle to accurately measure or control the output with insufficient supplies. Additionally, physical obstructions within the printer, such as dust or small paper fragments, can interfere with the print head’s movement or the sensors that guide it. Finally, software glitches or outdated printer drivers can prevent the alignment process from completing correctly.
Troubleshooting Print Head Alignment Failed Messages
Before diving into complex solutions, let’s tackle the most common and easiest fixes. Many instances of print head alignment failed can be resolved with a simple restart or by ensuring the printer is set up correctly. Checking your paper, ink levels, and looking for obvious obstructions are always the first steps in effective troubleshooting.
Step 1: Basic Checks and Restarts
Begin by performing a full power cycle on your printer. Turn it off using the power button, unplug it from the wall socket, and wait for at least 60 seconds. While it’s unplugged, gently open any accessible printer covers and visually inspect for any jammed paper scraps or foreign objects. After waiting, plug the printer back in, turn it on, and attempt to run the alignment process again.
Step 2: Verify Paper Settings and Type
The paper you’re using significantly impacts print quality and alignment. Ensure you are using plain paper that matches the specifications outlined in your printer’s manual. Some printers have specific settings for paper type (e.g., plain, glossy, photo paper) within their driver or on the printer’s control panel. Make sure these settings correspond to the paper loaded in the tray. Incorrect paper settings can lead to the alignment test page error if the printer cannot properly read the test pattern.
Step 3: Check Ink or Toner Levels
Low ink or toner can hinder the alignment process, especially in inkjet printers where the print heads need sufficient ink to function correctly. Access your printer’s software utility on your computer or check the printer’s LCD screen to see the current levels of all ink or toner cartridges. If any are critically low or empty, replace them with genuine manufacturer cartridges.
Step 4: Cleaning the Print Heads (Inkjet Printers)
For inkjet printers, clogged print heads are a frequent culprit. Most printers have a built-in utility for cleaning the print heads. Access this through your printer’s software on your computer or via the printer’s control panel menu. Usually, you’ll need to select “Maintenance” or “Tools” and then choose “Head Cleaning.” Running the cleaning cycle one or two times is typically sufficient. After cleaning, always try to run the automatic print head alignment again.
Performing Manual Print Head Alignment
If the automatic alignment continues to fail, you may need to perform a manual alignment. This process usually involves printing a test page with alignment patterns and then manually entering codes or selecting the best-aligned pattern displayed on your screen. The exact procedure varies by manufacturer, but the general steps are similar.
Step 5: Initiating Manual Alignment
Access your printer’s maintenance settings via the printer driver software on your computer. Look for an option such as “Print Head Alignment” or “Manual Alignment.” The printer will then instruct you to print a special alignment sheet. Follow the on-screen prompts to print this document.
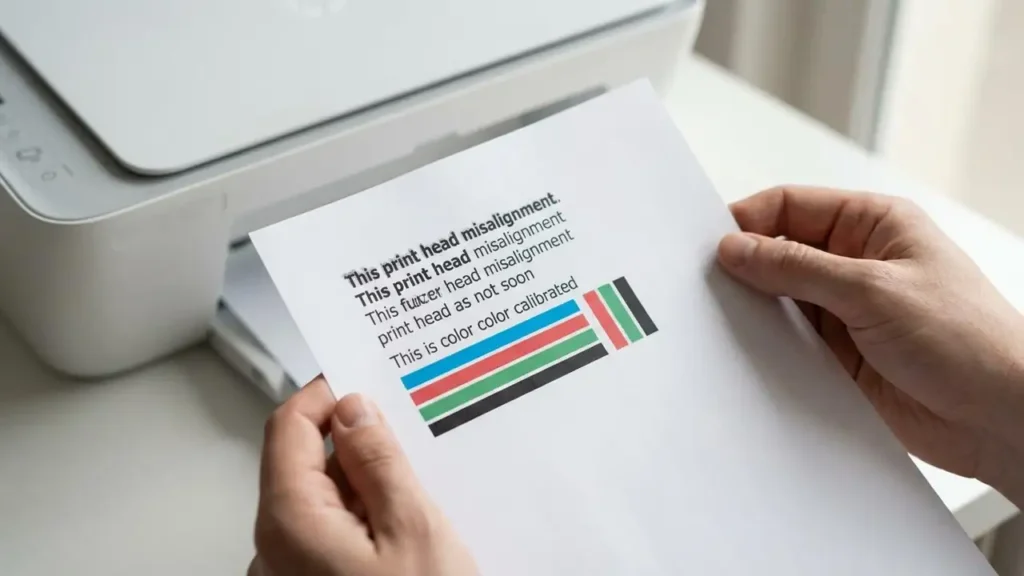
Step 6: Inputting Alignment Data
Once the alignment sheet is printed, examine it closely. You will see several sets of alignment patterns, often labeled with numbers or letters. The printer software will then prompt you to identify the pattern that appears most correctly aligned for each set. Carefully select the corresponding number or letter on your computer screen. Be precise, as this manual input guides the printer’s calibration.
Addressing Specific Error Codes
While the general troubleshooting steps apply broadly, specific error codes provide further clues. For Canon printers, support code 2500 Canon specifically indicates a problem with the print head alignment process. This can stem from any of the causes mentioned above, but it often points towards an issue that the automatic system couldn’t resolve on its own, necessitating the manual alignment steps. For HP printers, similar issues might arise, leading to an HP printhead alignment not working scenario, which also benefits from manual intervention and careful observation of printed patterns.
Software and Driver Updates
Outdated or corrupted printer drivers are another common reason for print head alignment failed issues. Ensure you have the latest drivers installed for your specific printer model and operating system. You can usually download these from the manufacturer’s official website. Uninstalling and then reinstalling the printer driver can sometimes resolve underlying software conflicts that interfere with the alignment process.
Safety and Warranty Considerations
When performing any maintenance on your printer, always prioritize safety. Before opening printer covers or touching internal components, ensure the printer is powered off and unplugged from the electrical outlet. Avoid touching the sensitive print head assembly or ink nozzles directly with your fingers, as oils and dirt can cause damage. While most of these troubleshooting steps are safe for users, significant internal repairs or component replacements may require professional assistance. Tampering with certain parts or performing unauthorized repairs could void your printer’s warranty. If you’re unsure or uncomfortable with any step, consult your printer’s manual or contact an authorized service provider.
Preventing Future Alignment Problems
To minimize future instances of print head alignment failed errors, establish a routine maintenance schedule. Print regularly, even if it’s just a test page every week or two, to prevent ink from drying in the nozzles. Always use high-quality, compatible ink or toner cartridges. Keep your printer clean, both externally and by periodically checking for internal debris. Ensure your printer driver software is kept up-to-date. Following these preventive measures will help maintain optimal print quality and reduce the occurrence of alignment issues.
By systematically addressing potential causes, from simple paper settings to manual calibration, you can often overcome the frustration of a print head alignment failed message. Persistent issues, especially those involving specific error codes like support code 2500, may still require professional attention, but these steps cover the most common resolutions for most users.