
Executing a Canon Error 5B00 Fix requires absolute precision. This specific fault code indicates that the printer’s internal waste ink absorber pad has reached its maximum theoretical saturation point. Most users immediately search for free reset software, indiscriminately flashing their motherboard. This is a fatal mistake that permanently locks (bricks) the EEPROM chip, turning the printer into electronic waste.
This comprehensive engineering guide outlines the physics behind the waste ink purge unit, the exact hardware keystrokes required to safely enter Canon Service Mode, and the dual-phase intervention (software EEPROM reset plus physical pad extraction) necessary to restore your device to factory operational status without damaging the logic board.
The Engineering Behind the Waste Ink System
Unlike laser printers that use dry powder, inkjet printers like the Canon PIXMA, MAXIFY, and MegaTank (G-series) rely on liquid ink. To keep the microscopic nozzles on the printhead from clogging, the printer performs a “purge” or “head cleaning” cycle. A vacuum pump sucks fresh ink through the nozzles and spits the excess waste into a highly absorbent, high-density sponge located at the base of the printer chassis.
The printer does not have a physical liquid sensor to know when this pad is full. Instead, the logic board calculates the volume of ink purged using an algorithm stored in the EEPROM (Electrically Erasable Programmable Read-Only Memory). When this internal counter hits 100%, the motherboard initiates a hard lockout—Error 5B00 (seven alternating flashes of the green and orange LEDs)—to prevent liquid ink from overflowing onto your desk or short-circuiting the internal power supply.
To perform a permanent Canon Error 5B00 Fix, you must address both the digital counter and the physical liquid saturation.
Phase 1: Bypassing the Motherboard Lockout (Service Mode)
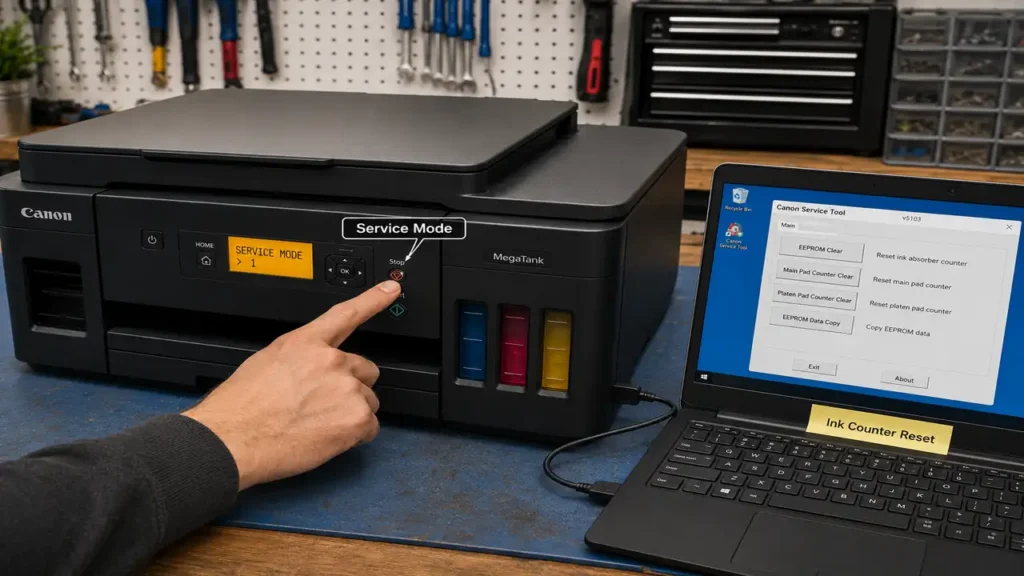
Before any software tool can communicate with the motherboard to rewrite the counter, you must manually bypass the standard boot sequence and put the logic board into “Service Mode.”
Warning: If you execute a software tool while the printer is in standard operating mode, it will corrupt the ROM data.
-
Total Power Cut: Turn the printer off. Leave it plugged into the AC wall outlet.
-
The Hold: Press and hold the Stop/Reset button (usually a red triangle inside a circle).
-
The Ignition: While keeping the Stop button depressed, press and hold the Power (ON) button. You are now holding both buttons.
-
The Release Sequence: While continuing to hold the Power button, release the Stop button.
-
The Five Keystrokes: Press the Stop button exactly five times in a row. On the fifth press, release the Power button simultaneously.
Diagnostic Check: The green Power LED will blink for several seconds and then remain solid green. The screen (if your model has one) will remain completely blank. Your Canon is now safely in Service Mode. (Note: If the orange light stays solid instead of green, the EEPROM is already locked due to previous failed attempts, and the motherboard requires physical chip replacement).
Phase 2: The Digital EEPROM Reset Protocol
Now that the USB communication ports are open to root-level commands, you need a verified Canon Service Tool. Do not use generic tools like “V3400” on newer G-Series printers; this will instantly brick the board. Use Service Tool V5111, V5302, or newer. Get Link
-
Connect the printer directly to a Windows PC via a high-speed USB cable. Do not attempt this over Wi-Fi.
-
Extract and run the authorized Canon Service Tool executable as an Administrator.
-
The software should detect your printer model in the top-right corner. Ensure the USB port shows a valid connection, not “Error.”
-
Locate the “Clear Ink Counter” section.
-
Under the “Absorber” dropdown menu, select Main.
-
Click the Set button exactly once.
-
A dialogue box stating “A function was finished” will appear. Click OK.
-
Turn off the printer via the physical power button to save the new hexadecimal values to the EEPROM.
You have successfully reset the digital counter. However, the Canon Error 5B00 Fix is only 50% complete.
Phase 3: Physical Extraction and Decontamination
If you run the printer after a digital reset without physically cleaning the absorber, the purge pump will continue pushing liquid into a saturated sponge. The ink will inevitably overflow, flooding the carriage motor, optical encoder strip, and ribbon cables, causing catastrophic electrical failure.
Chassis Disassembly and Pad Extraction
-
Unplug the AC cord. Put on heavy-duty nitrile gloves; waste ink permanently stains skin.
-
Depending on your model (e.g., G2010 or PIXMA G3000), locate the rear or bottom access panel. Remove the Phillips screws securing the plastic casing.
-
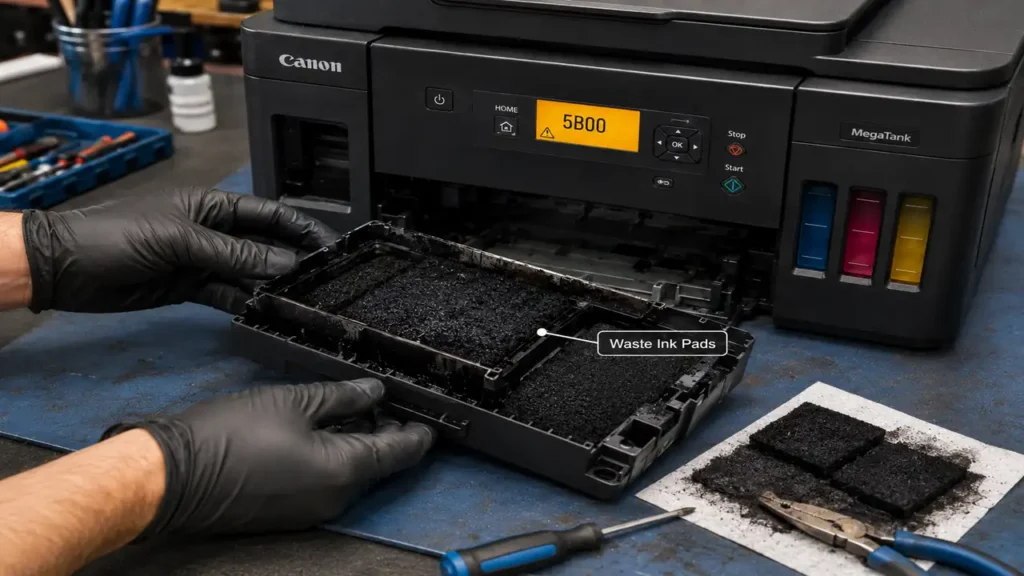
Extract the white plastic tray containing the high-density felt pads. You will notice they are completely black and heavy with liquid.
-
Carefully lift the pads out of the tray using a nylon spudger or tweezers. Note their specific arrangement and layering order; they must be reassembled identically.
The Washing and Drying Protocol
-
Take the pads to an industrial sink or an outdoor basin.
-
Flush the pads under lukewarm running water. Gently squeeze them (do not wring or twist, as this destroys the capillary fibers) until the water runs completely clear.
-
Submerge the pads in a bath of warm water and a small amount of Isopropyl Alcohol to break down any crystallized pigment.
-
The Drying Mandate: The pads must be 100% dry before reinstallation. Squeeze out excess water using paper towels, then leave them in a warm, well-ventilated area for 24 to 48 hours. Using a heat gun will warp the synthetic fibers.
Phase 4: Reassembly and System Priming
Once the pads are completely dry and stiff, place them back into the plastic tray in their original configuration. Secure the chassis screws.
Plug the printer into the wall outlet and turn it on. Because the EEPROM was reset in Phase 2, the printer will initialize normally without the alternating orange and green flashes. To complete the Canon Error 5B00 Fix, run a standard “Printhead Cleaning” cycle from the maintenance menu. This will prime the vacuum pump, push a small amount of fresh ink into the newly cleaned pads, and restore optimal hydrostatic pressure within the internal tubing.