
Installing a new toner cartridge in a Canon printer occasionally results in a persistent “Insert Cartridge” or “No Toner Detected” error on the display panel, even when the cartridge is correctly seated.
While standard troubleshooting steps often focus on microchip cleaning or driver updates, the root cause is frequently mechanical rather than software-based. When the printer’s firmware fails to recognize a physically installed cartridge, the issue typically originates from a loss of continuity at the internal contact sensors.
This technical guide outlines the diagnostic process to identify and resolve internal contact spring misalignment, allowing the printer to accurately detect the installed toner and clear the error state.
Immediate Resolution: Resetting the Internal Contact Springs
If the printer fails to perform the initial cryptographic handshake with the cartridge chip, the primary hardware intervention involves realigning the physical sensors inside the printer cavity.
-
Power down the Canon printer and disconnect the power cable from the wall outlet to ensure electrical safety.
-
Open the front toner access panel and carefully remove the toner cartridge (and the drum unit, depending on the model architecture).
-
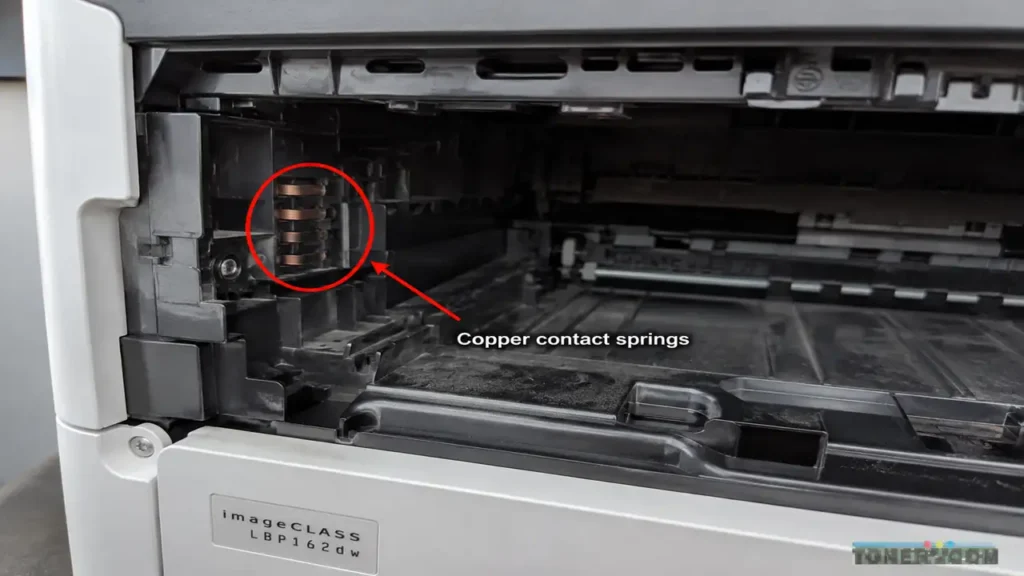
Inspect the deep left-hand side wall of the internal printer cavity.
-
Locate the cluster of copper contact springs (typically 2 to 4 small metal pins) protruding from the plastic housing.
-
Using a non-conductive tool, such as a plastic spudger or a dry pen cap, gently pull these copper springs outward (towards the center of the cavity) by approximately 1 to 2 millimeters. This restores their natural mechanical tension.
-
Reinstall the toner cartridge firmly. The restored tension forces a solid electrical connection with the cartridge’s microchip, clearing the detection error.
Technical Diagnosis: The Mechanics of Cartridge Detection
To prevent recurring detection failures, it is necessary to understand Canon’s hardware architecture. Canon imageCLASS and i-SENSYS printers utilize these internal copper pins to transmit voltage and read the data stored on the cartridge’s Customer Replaceable Unit Monitor (CRUM) chip.
Over multiple replacement cycles, mechanical metal fatigue occurs. Repeatedly inserting toner cartridges, particularly if slightly misaligned, pushes the copper springs back into their plastic housing. Over time, the springs lose their elasticity and remain flattened.
When a new cartridge is inserted, the microchip hovers a fraction of a millimeter away from the flattened pins. The motherboard registers an open circuit, prompting the firmware to report that no cartridge is present. This hardware disconnect is why software updates or wiping the chip surface often yield no results.
Advanced Diagnostics: Oxidation Cleaning and NVRAM Reset
If adjusting the physical tension of the springs does not establish a connection, the sensors may be suffering from carbon oxidation, or the printer’s Non-Volatile Random Access Memory (NVRAM) may be retaining a localized error state.
Phase 1: Contact Oxidation Removal
Airborne toner dust—composed of pulverized polymers and carbon—can coat the internal copper springs, creating an insulating barrier.
-
Step 1: Ensure the printer remains disconnected from all power sources.
-
Step 2: Lightly dampen a lint-free swab with 99% Isopropyl Alcohol. Avoid using standard rubbing alcohol or water to prevent conductive residue.
-
Step 3: Carefully clean the exposed tips of the copper contact springs to remove the carbon buildup.
-
Step 4: Allow a minimum of 3 minutes for the alcohol to evaporate completely.
-
Step 5: Verify the spring tension before reinserting the cartridge assembly.
Phase 2: NVRAM State Clearing
If the hardware connection is verified but the motherboard continues to display the error, force a hard memory reset to clear cached system states.
-
Step 1: With the printer plugged in and displaying the error, disconnect the power cord directly from the rear port of the machine.
-
Step 2: Press and hold the physical power button on the control panel for 30 seconds. This process drains the residual electrical charge from the motherboard’s capacitors.
-
Step 3: Reconnect the power cord and initialize the printer. This forces the firmware to execute a comprehensive Power-On Self-Test (POST) and re-establish a fresh handshake with the toner chip.
Hardware Reference: Vulnerable Canon Architectures
This specific sensor fatigue issue is documented frequently in the following Canon laser printer families due to their chassis design configurations:
| Printer Series | Compatible Cartridge SKU | Sensor Configuration | Recommended Diagnostic |
| Canon imageCLASS MF440 Series | Cartridge 057 / 057H | Left-wall 4-pin cluster | Tension Adjustment & Cleaning |
| Canon i-SENSYS LBP220 Series | Cartridge 057 | Deep rear 2-pin sensor | Isopropyl Cleaning |
| Canon imageCLASS MF230 / MF240 | Cartridge 137 / 737 | Side-wall flat contacts | NVRAM Hard Drain |
| Canon LBP6230dw | Cartridge 126 / 326 | Exposed copper wire | Gentle Tension Pull |
Standard Maintenance Protocols
When performing internal adjustments, observing standard technical protocols is essential to prevent secondary hardware damage.
-
Avoid Conductive Tools: Utilizing metal screwdrivers or tweezers to adjust the copper springs can scratch the conductive plating or induce a static short circuit. Always utilize non-conductive, plastic tools.
-
Maintain Tension Limits: The contact springs require a maximum adjustment of 2 millimeters. Over-tensioning the springs increases the risk of the wires snapping during the subsequent cartridge installation, which necessitates a formatter board replacement.
-
Manage Airborne Particulates: Do not use compressed air directly on the contact sensors. High-velocity air can drive toner dust deeper into the optical laser scanner unit, resulting in permanent print quality degradation.