Written by: Helen J. Halladay, Printer Repair Technician
Applies to: Epson EcoTank (L-Series / ET-Series) and WorkForce Models
Quick Answer
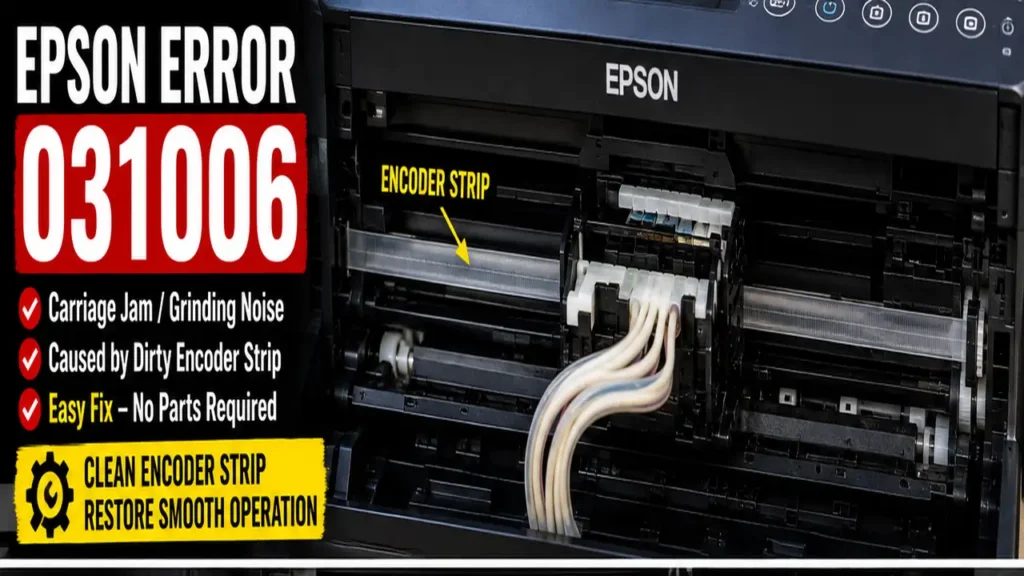
An Epson Error 031006, often accompanied by a loud grinding noise and a “Carriage Jam” message, means the printhead carriage has lost its positional tracking. The most common cause is a dirty Encoder Strip (the transparent plastic band behind the printhead) smeared with ink or grease. Cleaning this strip safely using distilled water—never harsh alcohol—will resolve the false jam and stop the grinding noise without requiring hardware replacement.
Applies To
-
Confirmed Models: Epson EcoTank L3110, L3150, L3210, L3250, ET-2720, ET-2750, and WorkForce WF-2800 series.
-
Hardware Component: Piezoelectric carriage assembly and CR (Carriage Return) timing strip.
Symptoms
-
The printer powers on and immediately makes a violent banging or grinding noise.
-
The printhead carriage slams hard against the right or left side of the internal chassis.
-
The screen or computer status monitor displays Error 031006, Error 000041, or Paper Jam, even when the paper path is completely clear.
Likely Causes (Ranked)
-
Dirty Encoder Strip: Ink splatters or gear grease has blinded the optical sensor behind the carriage.
-
Physical Obstruction: A small piece of torn paper or a foreign object (like a paperclip) is blocking the carriage path.
-
Dislodged Encoder Strip: The transparent strip has popped off its spring-loaded mounting hook.
-
Hardware Failure: A failed CR Motor or damaged carriage sensor (requires component replacement).
Before You Start
-
Safety Warning: DO NOT use high-concentration Isopropyl Alcohol (IPA), Windex, or harsh solvents on the encoder strip. The timing marks on this strip are microscopic and printed with delicate ink. Harsh chemicals will erase these lines, permanently blinding the sensor and ruining the strip.
-
Tools Required: Distilled water or a highly diluted, mild electronics cleaner, lint-free foam swabs (or a clean microfiber cloth), and a flashlight.
-
Preparation: Always unplug the printer’s power cord before reaching into the carriage cavity to prevent sudden movement.
Diagnosis Before Resetting
Before applying any fixes, rule out a basic physical block:
-
Turn off the printer and unplug the power cord.
-
Open the scanner unit or top cover to expose the internal carriage.
-
Use a flashlight to carefully inspect the far left and right resting stations. Remove any torn paper or debris using tweezers.
-
Locate the Encoder Strip (a thin, slightly grayish translucent plastic band running horizontally behind the carriage belt). If you see black ink smudges or thick grease spots on it, proceed to Fix 1.
Fixes: Safest to Most Invasive
Fix 1: Safe Encoder Strip Cleaning
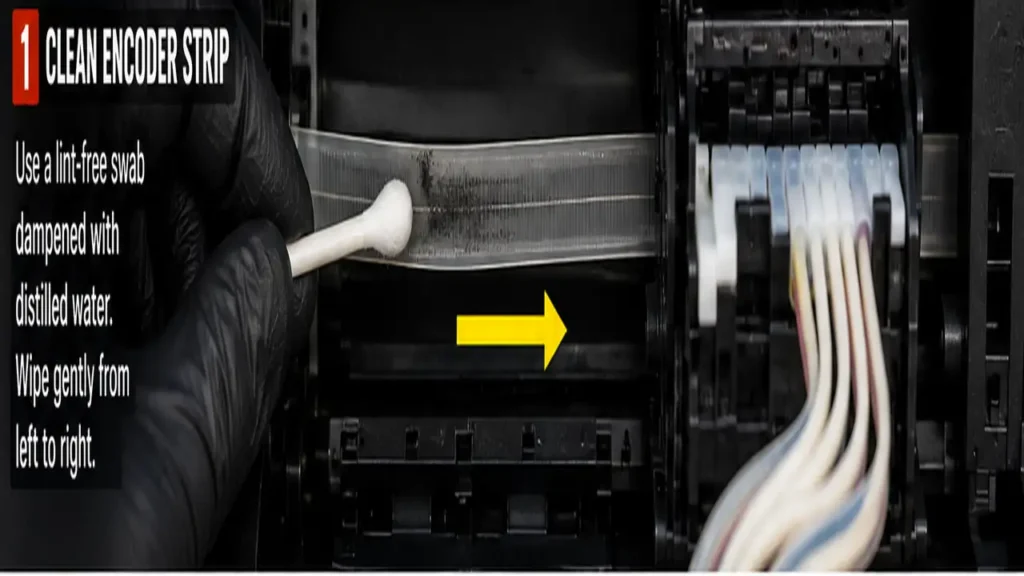
This is the standard manufacturer-aligned procedure to clear false carriage jams caused by optical sensor blindness.
-
With the printer unplugged, gently manually slide the printhead carriage to the center of the printer to access the full length of the strip.
-
Lightly dampen a lint-free swab or a corner of a microfiber cloth with distilled water. It should be slightly moist, not dripping.
-
Pinch the encoder strip gently with the damp cloth/swab between your thumb and index finger.
-
Slowly and gently wipe the strip from left to right. Do not pull hard, as the strip is held by a delicate spring on the left side.
-
Check the cloth for black ink or grease transfer. Use a dry part of the cloth to gently wipe away any remaining moisture.
-
Expected Result: The strip should look uniformly translucent without dark spots. If the strip was dirty, this step usually clears the Epson Error 031006.
Fix 2: Reattaching a Dislodged Encoder Strip
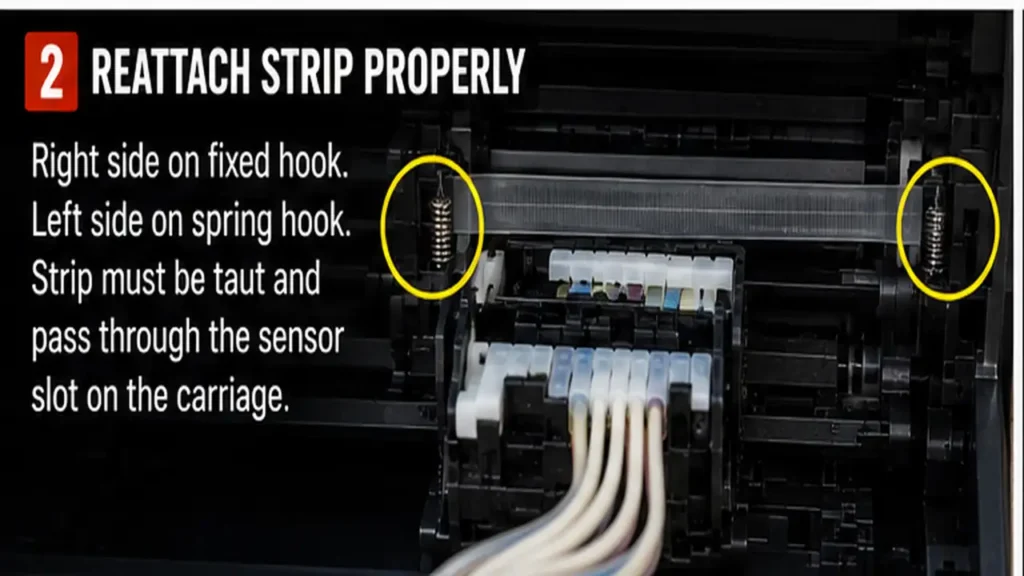
If the carriage slammed too hard, the strip might have popped off its mounting hooks.
-
Inspect both ends of the encoder strip. The right side attaches to a fixed metal or plastic hook. The left side attaches to a small tension spring.
-
If the strip is hanging loose, use tweezers to carefully guide the slotted hole on the right side over its hook.
-
Gently pull the left side of the strip, stretching the tension spring slightly, and hook the slotted hole over the spring’s anchor point.
-
Ensure the strip passes through the optical sensor slot on the back of the printhead carriage, not behind it or in front of it.
-
Expected Result: The strip should be taut and straight.
How to Verify the Repair
-
Close the scanner unit and plug the power cord back into the wall outlet.
-
Power on the printer.
-
Listen carefully: The carriage should move smoothly side to side during its initialization routine without any grinding noise.
-
Print a standard Nozzle Check from the maintenance menu to confirm normal printing operations.
If the Error Returns
| Symptom | Likely Cause | Next Action |
| Grinding stops, but printer prints blurry/double text | Encoder strip is clean but scratched or damaged. | The encoder strip must be physically replaced. |
| Grinding noise persists immediately on startup | Broken CR Motor or faulty Carriage Sensor. | Contact an authorized service center; mainboard or motor diagnostic required. |
| Error appears only when pulling paper | Paper feed sensor (PE Sensor) is jammed or faulty. | Inspect the rear paper tray for foreign objects blocking the sensor flag. |
Frequently Asked Questions
Official References
-
[Epson Support: Paper Jam Error but no paper is inside the product] (Use official Epson link here)
-
[Epson Maintenance and Cleaning Guidelines] (Use official Epson link here)
Related Guides:
- https://tonercom.net/2025/07/epson-end-of-service-life-error/
- https://tonercom.net/2026/04/epson-l3150-all-lights-blinking/
- https://tonercom.net/2026/04/epson-et-2800-2850-false-paper-jam/