Encountering a sudden halt in printing operations due to a false empty cartridge warning is a well-documented mechanical synchronization issue in modern laser printers. If you need to Fix Brother Replace Toner Error
permanently, standard software reboots are often insufficient. You must address the physical mechanism that communicates the toner level to the printer’s motherboard.
This technical diagnostic guide outlines the mechanical architecture of Brother toner cartridges and provides a precise, step-by-step protocol to manually reset the internal flag gear, restoring full operational status to your device.
The Diagnostics: How the Optical Sensor Works
Unlike Canon or HP printers that rely exclusively on cryptographic microchips to monitor page counts, Brother printers utilize a dual-authentication system: a microchip and a mechanical Flag Gear (also known as a reset gear).
When a new Brother cartridge (such as the TN-730, TN-760, or TN-830) is inserted, a spring-loaded plastic gear on the side of the cartridge physically rotates. As it spins, a plastic flag passes through a localized optical sensor inside the printer cavity. This physical interruption of the light beam signals the firmware to reset the internal page counter to 100%.
However, when refilling a cartridge, or when utilizing specific aftermarket compatible units, this gear may fail to rotate completely. The optical sensor remains untriggered, and the firmware locks the machine. The most effective protocol to Fix Brother Replace Toner Error involves manually resetting this physical gear to its default starting position.
Phase 1: Software NVRAM Bypass (The Front Panel Protocol)
Before disassembling the cartridge, attempt to clear the error state by overriding the Non-Volatile Random Access Memory (NVRAM) via the control panel. This method forces the motherboard to ignore the optical sensor temporarily.
-
Open the front cover of your Brother printer to expose the drum and toner assembly (leave the power on).
-
On printers with a two-line LCD, press both the “Back” and “Go” buttons simultaneously, then immediately press the “Back” button one more time.
-
A hidden diagnostic menu will appear on the display, showing “TNR-STR” (Toner Starter) or “TNR-STD” (Toner Standard).
-
Use the arrow keys to select your cartridge capacity type and press “OK”.
-
The screen will display “Accepted.” Close the front cover.
If the firmware accepts the command, the machine will execute a warm boot and initialize. If the software override fails, you must proceed to the physical hardware intervention to Fix Brother Replace Toner Error.
Phase 2: Hardware Intervention to Fix Brother Replace Toner Error
This physical realignment protocol requires a standard Phillips-head screwdriver and approximately five minutes of focused precision.
1. Component Isolation
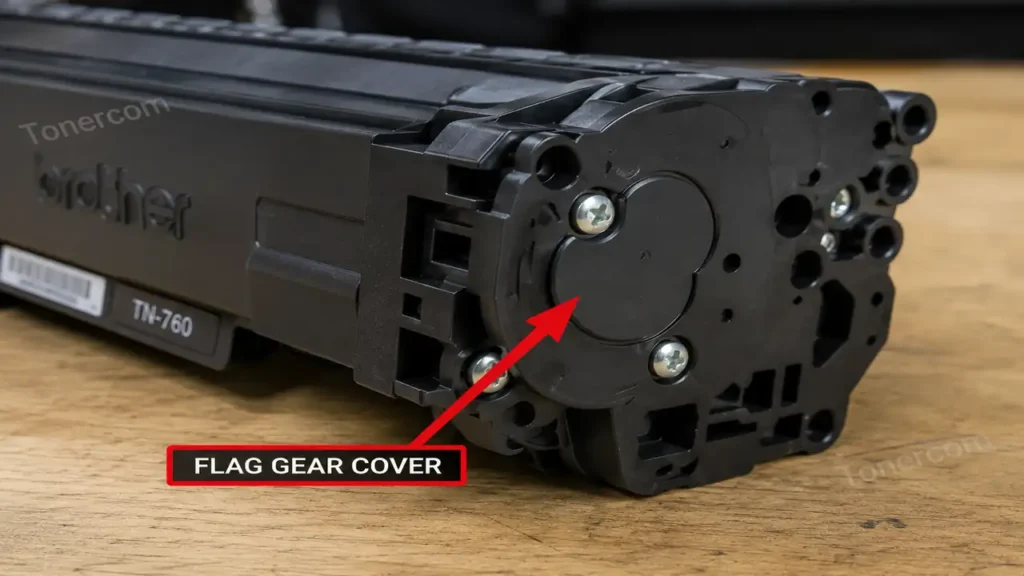
Remove the toner cartridge completely from the drum unit assembly. Place the cartridge on a flat, well-lit surface with the gear side (typically the left side, containing three small Phillips screws) facing upward.
2. End Cap Removal
Carefully extract the two or three Phillips screws securing the plastic end cap. Gently pry the end cap off. Take extreme care to maintain the orientation of the underlying gears, as they are lightly lubricated and spring-loaded.
3. Locating the Reset Gear
Identify the primary reset gear. This gear is distinctive; it possesses a semi-circular row of teeth and a protruding plastic arm (the flag). Adjacent to it is a tension spring.
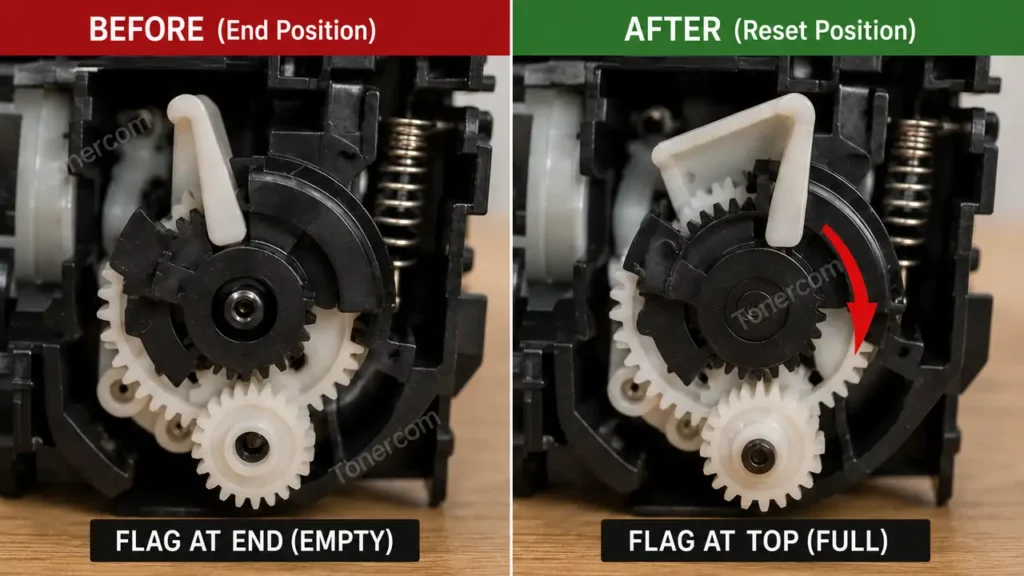
4. Realignment Procedure
Lift the reset gear slightly off its post. Rotate it counter-clockwise against the tension of the spring until the plastic flag is positioned at the absolute top, pointing towards the toner hopper. Ensure the semi-circular teeth are poised to engage with the developer roller gear upon the next rotation.
5. Reassembly and Seating
While holding the reset gear firmly in its new, tensioned position, carefully place the plastic end cap back over the gear cluster. Secure the screws tightly to prevent any lateral gear slippage. Reinsert the toner into the drum unit, slide the entire assembly back into the printer chassis, and close the front access door.
Executing this precise realignment procedure will definitively Fix Brother Replace Toner Error, forcing the optical sensor to register a completely new cartridge cycle.
Hardware Compatibility Matrix
The mechanical gear mechanism is standard across a wide range of Brother monochrome and color laser architectures. This diagnostic procedure applies directly to the following ecosystems:
| Printer Series | Cartridge SKU | Reset Mechanism Location | Recommended Protocol |
| Brother HL-L2350DW / L2395DW | TN-730 / TN-760 | Left side end-cap | Software Bypass / Gear Reset |
| Brother MFC-L2710DW / L2750DW | TN-760 / TN-770 | Left side end-cap | Gear Reset |
| Brother HL-L2460DW / L2465DW | TN-830 / TN-830XL | Left side (New architecture) | Advanced Gear Realignment |
| Brother HL-L3210CW (Color) | TN-223 / TN-227 | Individual color end-caps | Control Panel Software Override |