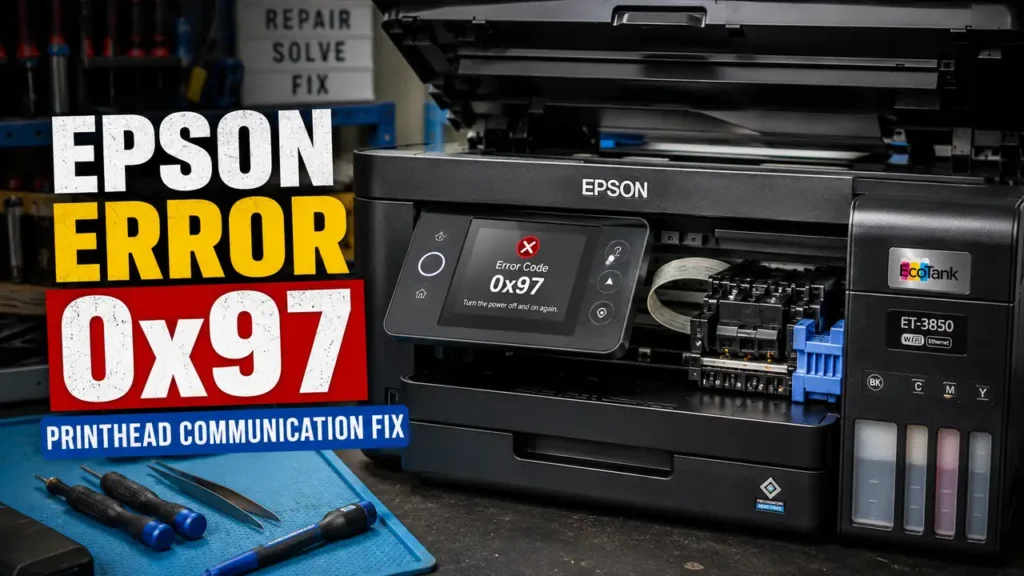
An Epson Error Code 0x97 Fix is highly sought after because this specific alphanumeric sequence acts as a digital death sentence for the WorkForce and EcoTank series. When this code flashes on the LCD, the carriage assembly violently halts, and the machine refuses all digital commands. The majority of internet forums will advise you to throw the printer in the trash, falsely claiming that the main logic board is permanently fried.
This is a profound misunderstanding of Epson’s hardware architecture. Error 0x97 specifically designates a critical loss of I2C serial communication between the main logic board and the piezoelectric printhead. This loss of signal is rarely a dead motherboard; it is almost always caused by a residual capacitive charge anomaly, severe oxidation on the Flexible Flat Cable (FFC) pins, or a blown surface-mount micro-fuse (the F1 fuse).
This technical teardown manual provides the exact voltage bleed protocols, the carriage disassembly sequence, and the multimeter diagnostics required to execute a permanent hardware rescue.
The Physics of Piezoelectric Communication Failure
To execute a successful Epson Error Code 0x97 Fix, you must understand how Epson printheads differ from HP or Canon. Epson utilizes “Micro Piezo” technology. Instead of using thermal resistors to boil ink, Epson uses microscopic piezoelectric crystals that physically bend and contract when electrical voltage is applied, acting like tiny mechanical pumps.
Because these crystals require continuous, precise voltage pulses, the printhead draws substantial current directly from the motherboard. If a microscopic drop of stray ink splashes onto the FFC terminal connector, or if power fluctuations cause a voltage spike, the motherboard immediately severs the connection to prevent a fire. This failsafe triggers the 0x97 hardware lock.
Phase 1: The Capacitive Voltage Bleed (Soft Reset)
Before tearing down the chassis to inspect the logic board, you must clear the capacitors. Modern printer power supplies retain lethal DC voltage long after the AC cord is pulled. This residual charge can trap the logic board in a phantom 0x97 error state.
-
Turn the printer off using the physical power button.
-
Disconnect the AC power cord from the wall outlet, and unplug the USB or Ethernet cables.
-
Wait exactly 5 minutes for the primary switching capacitors in the power supply to naturally discharge.
-
Press and hold the physical Power Button on the printer’s control panel for 60 solid seconds.
-
While holding the button, you are forcing the logic board to attempt a boot sequence without AC power. This entirely drains the microscopic Surface Mount Device (SMD) capacitors on the motherboard, wiping the volatile error memory.
-
Release the button, plug the AC cord directly into the wall (bypass all power strips and UPS units), and power on.
If the carriage initializes normally, the short was temporary. If the printer immediately grinds and throws the error again, you must proceed to the physical hardware intervention to find your Epson Error Code 0x97 Fix.
Phase 2: FFC Pin Decontamination and Carriage Teardown
If a hard voltage bleed fails, the communication blockage is physical. You must access the terminal pins connecting the motherboard to the printhead.
Carriage Release Protocol
When an Epson printer crashes with 0x97, the printhead carriage is usually locked in the right-side “capping station.” You cannot force it out by hand without shattering the locking gear.
-
Turn the printer on.
-
The moment the printhead moves slightly to the left during its initialization check, immediately yank the AC power cord from the wall.
-
The carriage is now unlocked and can be moved freely by hand to the center of the chassis for easy access.
FFC Extraction and Cleaning
-
Remove the ink cartridges.
-
Depending on your WorkForce model (e.g., WF-3640, WF-4630, WF-7620), you will need to remove the two to four Phillips screws securing the plastic printhead cover.
-
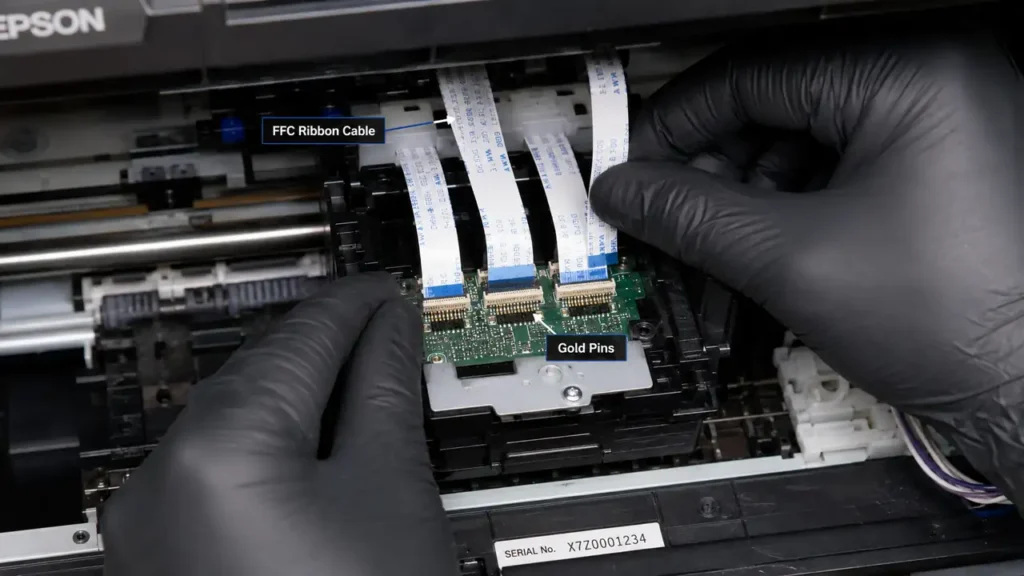
Carefully lift the plastic cover. You will expose the green PCB (Printed Circuit Board) mounted on top of the printhead, with two wide, white Flexible Flat Cables (FFC) plugged into it.
-
Using a nylon spudger, gently unclip the FFC cables and pull them straight up.
-
Inspect the exposed gold pins at the end of the cables under a magnifying glass.
-
If you see black scorch marks, blue corrosion, or wet ink bridging the pins, you have found the root cause of the error.
-
Dampen a lint-free polyurethane swab with 99% Isopropyl Alcohol (IPA). Gently wipe the gold pins in one direction (downward) until the copper shines. Do not bend the tips.
-
Allow the IPA to flash-evaporate for 3 minutes, reconnect the cables firmly, and reassemble the carriage.
Phase 3: The Logic Board SMD Fuse Diagnostic
If the cables are immaculate and the error persists, the failsafe mechanism on the main logic board has permanently triggered. You do not need a new motherboard; you need a soldering iron and a multimeter to execute the ultimate Epson Error Code 0x97 Fix.
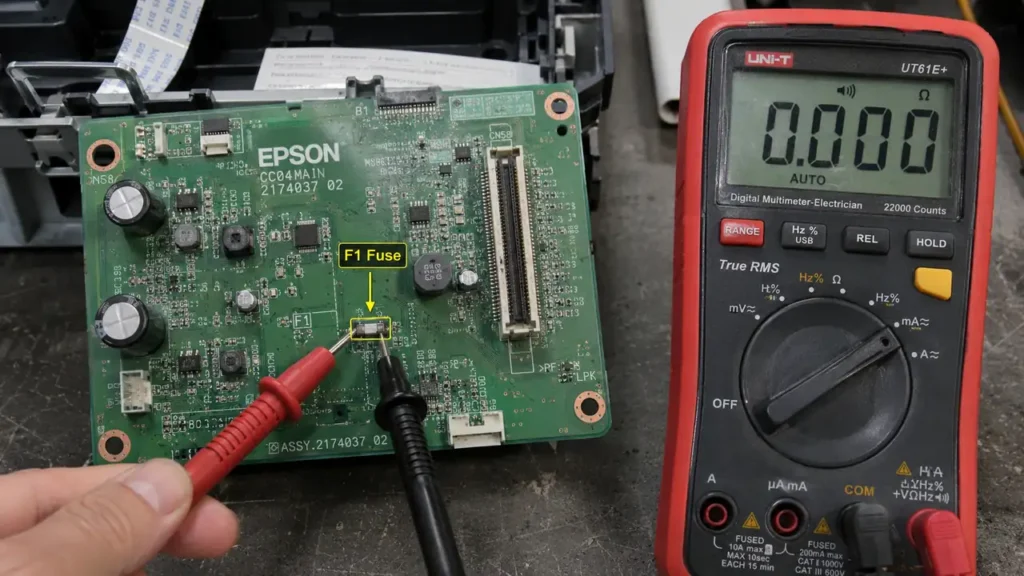
On every Epson logic board, positioned precisely next to the FFC connector terminals, is a microscopic surface-mount fuse labeled “F1” or “F2”. This fuse is designed to blow instantly if the printhead draws too much amperage, sacrificing itself to save the $150 main processor.
-
Disassemble the side panel of the printer to extract the main logic board.
-
Locate the F1 and F2 surface mount components (they are usually tiny, white or green rectangular chips marked with a single letter like “K” or “E”).
-
Set your digital multimeter to Continuity Mode (the icon that looks like WiFi waves, which beeps when a circuit is closed).
-
Place one probe on each side of the F1 fuse.
-
The Diagnosis: If the multimeter emits a continuous beep (0 Ohms), the fuse is healthy. The motherboard is not the issue; the printhead itself has an internal short and must be replaced.
-
The Confirmation: If the multimeter remains silent and displays “OL” (Open Loop), the fuse is blown.
To repair this, you must use a hot air SMD rework station to remove the dead fuse and solder a replacement (usually a 0603 size, 500mA fast-acting fuse). Bridging the fuse with a wire blob is highly discouraged; if the printhead surges again, the wire will not blow, and the main processor will instantly catch fire.
The Liquid Flush Warning (Post-Repair)
Many users trigger the 0x97 error by attempting to flush their clogged printhead with a syringe immediately prior to the crash. If you inject ammonia-based cleaning solutions into the piezoelectric nozzles with excessive force, the internal seals will rupture. The liquid climbs the internal shafts, spilling directly onto the FFC electronics board.
Once you successfully execute your Epson Error Code 0x97 Fix, you must never use high-pressure syringes for printhead cleaning. Instead, place a folded, IPA-soaked paper towel under the printhead carriage and let capillary action naturally draw the dried ink out over 12 hours.