

Factory Default Initialization on the Canon PIXMA G2000 and G3000 (24 Flashes)
On both the USB-only PIXMA G2000 and the wireless PIXMA G3000, you can initialize all customizable machine settings from the control panel:
-
Verify that the printer is turned on and the green ON lamp is steady.
-
Press and hold the Stop button continuously while counting the flashes of the orange Alarm lamp.
-
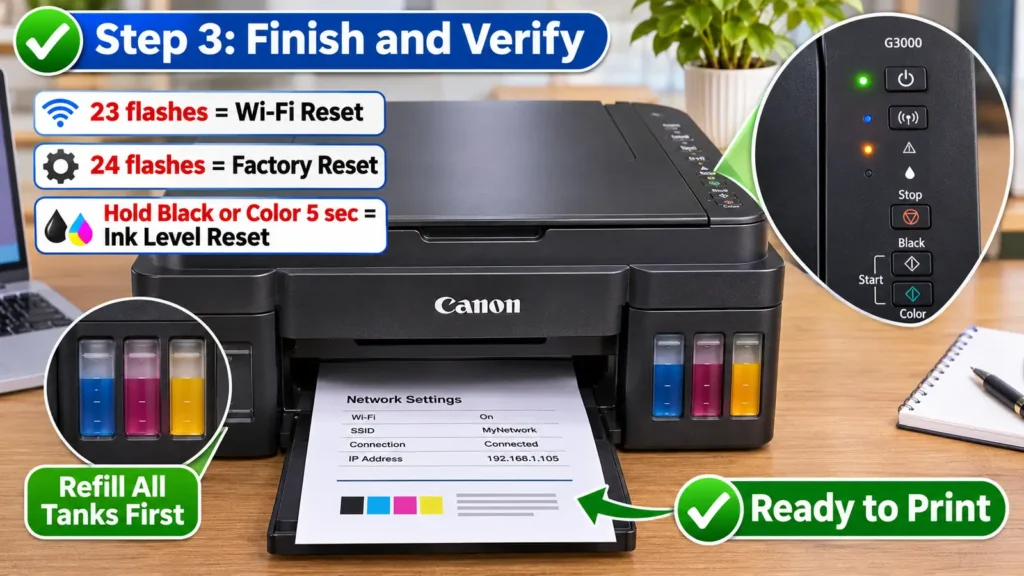
Release the Stop button immediately after the Alarm lamp flashes 24 times.
-
The green ON lamp will blink for a few seconds and return to solid green once all machine settings—including network settings and the IJ Network Tool administrator password on the G3000—have been restored to factory defaults.
Per Canon’s engineering specifications, the 24-flash initialization does not alter the current print head alignment position, SSL/TLS Certificate Signing Request (CSR) encryption settings, or the current remaining ink level counter status.
Resetting Wi-Fi, Fax, or All Settings on the Canon PIXMA G4000 via the LCD Menu
Because the Canon PIXMA G4000 has a built-in LCD screen and fax memory, Canon provides a granular Reset setting menu so you can wipe either your wireless network alone or the entire machine:
-
Turn on the Canon G4000 and press the Setup button (marked with the pliers-and-screwdriver icon).
-
Use the left or right arrow button to highlight Device settings and press OK.
-
Use the arrow buttons to select Reset setting and press OK.
-
Select the specific reset option that matches your troubleshooting goal and press OK:
-
LAN settings: Resets only wireless LAN and network configuration settings back to factory defaults (use this if you only want to fix a Wi-Fi connection without losing stored fax speed-dial numbers).
-
Web service setup: Clears registered cloud printing and web service accounts.
-
Telephone no. data: Deletes stored fax and telephone directory recipients.
-
FAX settings: Returns fax transmission and reception parameters to factory defaults (disconnect the telephone line cord from the back of the G4000 before running this option).
-
Setting data: Resets paper size, media type, and general copy/print settings while leaving your Wi-Fi and fax settings untouched.
-
All data: Resets all user-configured settings—including LAN settings, fax settings, and the Remote UI / IJ Network Device Setup Utility administrator password—back to factory defaults. (Display language, country/region selection, and print head position are preserved).
-
-
When the confirmation prompt appears on the LCD, use the arrow button to select Yes and press OK.
Resetting the Remaining Ink Level Counter (Support Code 1640) and Other Manual Panel Functions
A frequent point of confusion on first-generation MegaTank printers occurs when the Ink lamp and Alarm lamp light up or flash (Support Code 1640) to warn that an ink tank has neared its lower limit line. Because the G1000, G2000, G3000, and G4000 do not use float sensors inside the ink tanks, simply pouring new ink into the tanks will not clear the low-ink warning automatically—you must manually reset the remaining ink level counter.
Critical Rule Before Resetting the Ink Level Counter
Canon’s remaining ink notification system calculates ink consumption by counting nozzle firings from a known full baseline. Before resetting the remaining ink level counter, you must refill all four ink tanks (Black, Cyan, Magenta, and Yellow) up to their upper limit lines. If you reset the ink counter when one or more tanks are only partially full, the printer will misjudge the remaining supply and may draw air into the ink tubes later.
-
Canon PIXMA G1000 Ink Counter Reset: When the Alarm lamp lights or flashes for low ink, refill all four tanks to the upper limit line, close the top cover, and press and hold the RESUME/CANCEL button for at least 5 seconds until the Alarm lamp turns off. (Caution: Pressing and immediately releasing RESUME/CANCEL instead of holding it for 5 seconds completely disables the remaining ink level notification function).
-
Canon PIXMA G2000 and G3000 Ink Counter Reset: When the Ink and Alarm lamps indicate low ink, refill all four ink tanks to the upper limit line, close the scanning unit/cover, and press and hold either the Black button or the Color button for at least 5 seconds until the Alarm lamp goes off. (Pressing and immediately releasing Black or Color disables remaining ink tracking instead of resetting the counter).
-
Canon PIXMA G4000 Ink Counter Reset: Refill the ink tanks to the upper limit line, press Setup on the control panel, select Ink notification set. and press OK, then select Reset ink lev. count and press OK. Select Yes at both LCD confirmation prompts and press OK.
-
Resetting via Computer (All Models): On Windows, you can also open Printer Properties > Maintenance tab > Remaining Ink Notification Settings, ensure all four tanks are filled to the upper limit line, and click Reset.
Complete Stop-Button Flash Count Reference for G1000, G2000, and G3000 (Normal User Mode)
When your screenless Canon G1000, G2000, or G3000 is powered on with a steady green ON/POWER lamp, holding down the Stop button (or RESUME/CANCEL on the G1000) and releasing it after a specific number of orange Alarm lamp flashes triggers built-in maintenance and configuration routines without needing a PC:
| Alarm Lamp Flashes | Action Triggered Upon Releasing Stop / RESUME | Applicable Models & Follow-Up Button Press |
| 1 flash | Prints a Nozzle Check Pattern sheet | G1000, G2000, G3000 (Load plain A4/Letter paper first) |
| 2 flashes | Runs a Standard Print Head Cleaning | G1000, G2000, G3000 (Takes ~1–2 minutes) |
| 3 flashes | Runs a Deep Print Head Cleaning | G1000, G2000, G3000 (Takes ~3 minutes; uses more ink) |
| 8 flashes | Runs a full Ink System Flush (purges air from CISS tubes) | G1000, G2000, G3000 (Ensure all ink tanks are well above the lower line) |
| 17 flashes | Configures Auto Power Off timer status | G2000, G3000 — Press Color after releasing to Enable, or Black to Disable |
| 18 flashes | Configures Auto Power On when print/scan data arrives | G2000, G3000 — Press Color after releasing to Enable, or Black to Disable |
| 23 flashes | Initializes Network / Wi-Fi Settings Only | G3000 series only (Wipes wireless LAN credentials) |
| 24 flashes | Initializes All Machine Settings to Factory Defaults | G2000, G3000 series (Resets device, copy, and network settings) |
Troubleshooting When a Canon G-Series Manual Reset Fails
If your printer does not respond as expected during any of the procedures above, isolate the cause using these targeted checks:
-
Solid Orange Alarm Light After Trying to Enter Service Mode: Either the Stop (RESUME/CANCEL) button was pressed the wrong number of times while holding ON (for example, 2 or 6 times instead of 5), or an incompatible resetter utility previously corrupted the service mode counter in the EEPROM. Unplug the printer for 60 seconds, reconnect power, and repeat the exact 5-press entry sequence. If the printer boots normally in User Mode but turns solid orange every time you enter Service Mode, the EEPROM IC on the formatter board is locked and must be reprogrammed with a hardware programmer or replaced.
-
Service Tool Buttons Are Grayed Out (Error 006) on PC: Error 006 in Canon Service Tool means the printer is not in Service Mode or another print job is sitting in the Windows print spooler. Cancel all pending documents in your computer’s print queue, connect the printer via a direct rear USB 2.0 port (avoid USB hubs), and verify the printer’s ON lamp is solid green in Service Mode before opening the software.
-
Alarm Lamp Blinks Instead of Entering the 23-Flash or 24-Flash Reset: You cannot run a 23-flash Wi-Fi reset or 24-flash factory reset while an active error (such as an empty paper tray, paper jam, or 5B00 waste ink lockout) is flashing on the panel. Clear the active hardware error first so the green ON lamp stays solid, then hold the Stop button and count the flashes.