

Diagnostic Check: Distinguish Support Code 5B00 from Support Code 1700
Before entering Service Mode, look closely at the LED blink pattern on the operation panel:
-
8 Flashes of the Alarm Lamp Only (Support Code 1700 / 1701): If the green ON/POWER lamp stays steady and only the orange Alarm lamp flashes 8 times, pauses, and repeats, the waste ink absorber is approximately 95% full (“Ink absorber is almost full”). You do not need a Service Mode reset yet. Press the RESUME/CANCEL button (G1000), the Black or Color button (G2000/G3000), or the OK button (G4000) once to dismiss the warning and continue printing.
-
7 Alternating Flashes Between ON/POWER and Alarm Lamps (Support Code 5B00 / 5B01, Error P07): The waste ink counter has reached 100% and locked the printer. Normal button presses will not clear this state; the printer must be booted into Service Mode.
Phase 1: Entering Service Mode on the G1000, G2000, G3000, and G4000
Every waste ink counter reset—whether completed through the front panel buttons or with diagnostic software—requires putting the printer into Service Mode first.
-
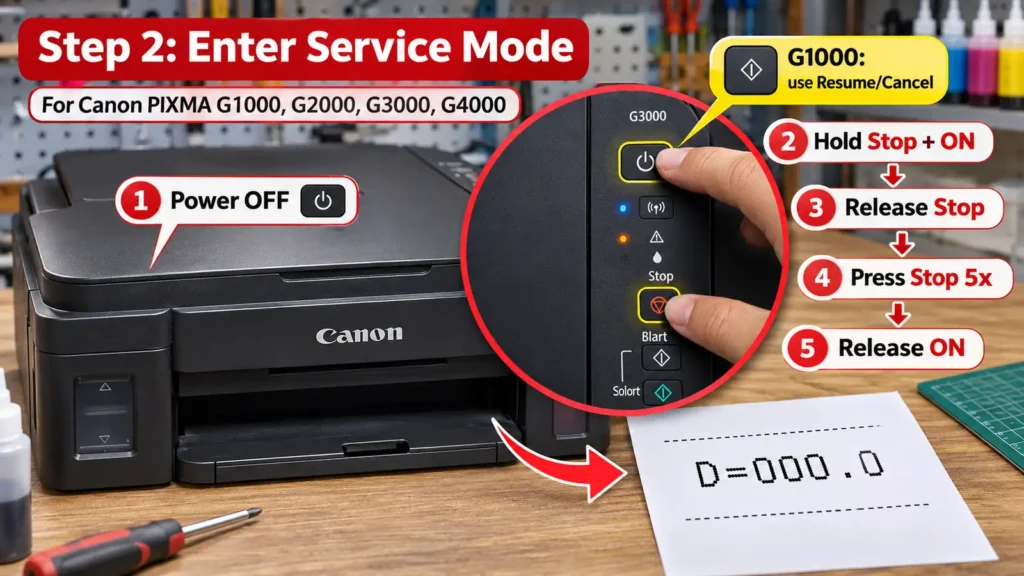
Press the ON button to turn the printer completely off. Wait until all carriage movement stops and the green ON/POWER lamp is completely extinguished. Do not unplug the power cord while the lamp is still blinking.
-
Load 2 to 3 sheets of plain A4 or Letter paper into the rear paper tray so the printer can output a confirmation page.
-
Press and hold the Stop button (or the RESUME/CANCEL button on the PIXMA G1000) with one finger.
-
While continuing to hold Stop (RESUME/CANCEL), press and hold the ON (Power) button with a second finger. The green ON/POWER lamp will illuminate.
-
Keep holding the ON button firmly down, and release only the Stop (RESUME/CANCEL) button.
-
While still holding the ON button down without interruption, press and release the Stop (RESUME/CANCEL) button 5 times at a steady pace. With each press, the indicator lamps will alternate between orange and green, starting with orange on the first press and ending on orange on the fifth press.
-
Immediately after the 5th press of Stop (RESUME/CANCEL), release the ON button.
-
Wait 10 to 20 seconds while the internal mechanisms initialize and the green ON/POWER lamp blinks. Once the ON/POWER lamp turns solid green and the Alarm lamp remains completely off, the printer is in Service Mode.
Important Precaution: Always press Stop (RESUME/CANCEL) exactly 5 times when entering Service Mode on the G1000, G2000, G3000, and G4000. Pressing it 2 times or 6 times (sequences meant for older MG or iP series printers) will cause the printer to fail Service Mode entry and display a solid orange Alarm light.
Phase 2: Clearing the Waste Ink Counter via the Control Panel Button Sequence
On Canon PIXMA G1000, G2000, and G3000 units running firmware that permits panel-based service commands (such as Canon firmware V3.30 or later, or mainboards with unlocked service command tables), you can execute the waste ink counter reset directly from the buttons without a computer:
-
Verify the printer is in Service Mode (the ON/POWER lamp is solid green and the Alarm lamp is off) and plain paper is loaded in the rear tray.
-
Press and release the Stop (RESUME/CANCEL) button 5 times in succession to select the Main Waste Ink Counter Clear function. The Alarm and ON lamps will alternate orange and green with each press.
-
Press the ON (Power) button 1 time to execute the reset command.
-
Listen for the carriage and paper feed rollers to engage. When the reset succeeds, the printer feeds a single sheet of paper and prints
D=000.0(orD=000.0 Ps=000.0) near the top edge, confirming the waste ink counter has been reset to zero. -
Once the confirmation page ejects, press the ON button once to turn the printer off. Wait 5 seconds, then press ON again to start the printer in normal operating mode.
Note on Regional Board Revisions: On certain early G1000, G2000, and G3000 production batches where the single 5-press command does not trigger a printout, technicians use the extended two-register button sequence immediately after entering Service Mode: press Stop 4 times then ON 1 time, wait 3 seconds, press Stop 3 times then ON 1 time, and finally press Stop 5 times then ON 1 time to print the D=000.0 confirmation sheet.
Why Some G1000–G4000 Units Require a Service Tool Utility in Service Mode
If your printer enters Service Mode (solid green ON lamp), but pressing Stop 5 times and ON 1 time produces no paper feed and leaves the 5B00/P07 error active after restarting, your printer’s factory firmware has disabled button-only EEPROM counter clearing. This restriction is common on earlier firmware versions of the G1000, G2000, and G3000, as well as on the LCD-equipped PIXMA G4000.
When button-only clearing is disabled in firmware, Service Mode acts strictly as a USB diagnostic interface:
-
Put the printer into Service Mode using the exact 5-press entry procedure in Phase 1 until the ON/POWER lamp stays solid green.
-
Connect the printer to a Windows PC using a USB cable. Windows will detect a new USB device labeled Canon Device.
-
Open a compatible Canon G-series reset utility—such as Canon Service Tool v4718, v4720, v4905, or ST5103, or the WIC Reset Utility. (Never run older utilities such as Service Tool v3400 or v1050 on a G-series printer; older tools write to the wrong memory address and will permanently lock the EEPROM into a solid orange Alarm light state).
-
In the Canon Service Tool under the Clear Ink Counter section, select Main from the absorber dropdown menu and click Set.
-
The printer will feed a sheet of paper printed with
D=000.0and display a window reading A function was finished. If the software includes a Platen ink counter option, select Platen and click Set as well. -
Close the software and press the printer’s ON button to power it off and exit Service Mode.