

Performing an HP Smart Tank 530 Ink Flush
Users troubleshooting missing colors or air-filled supply lines frequently look for an hp smart tank 530 ink flush option on the control panel, expecting a menu item named identically to Canon’s “Ink Flush” or Epson’s “Power Ink Flushing.” On the HP Smart Tank 530 series (as well as sibling models such as the Smart Tank 515, 519, and 615), HP does not use the label “Ink Flush” in the firmware menu. Instead, the printer uses a staged, three-level Clean Printhead utility that progressively increases pump suction and purge volume to clear air from the replaceable thermal printheads (HP M0H51A Black and M0H50A Tri-color) and re-prime the ink lines.
Step-by-Step HP Smart Tank 530 Purge Procedure
-
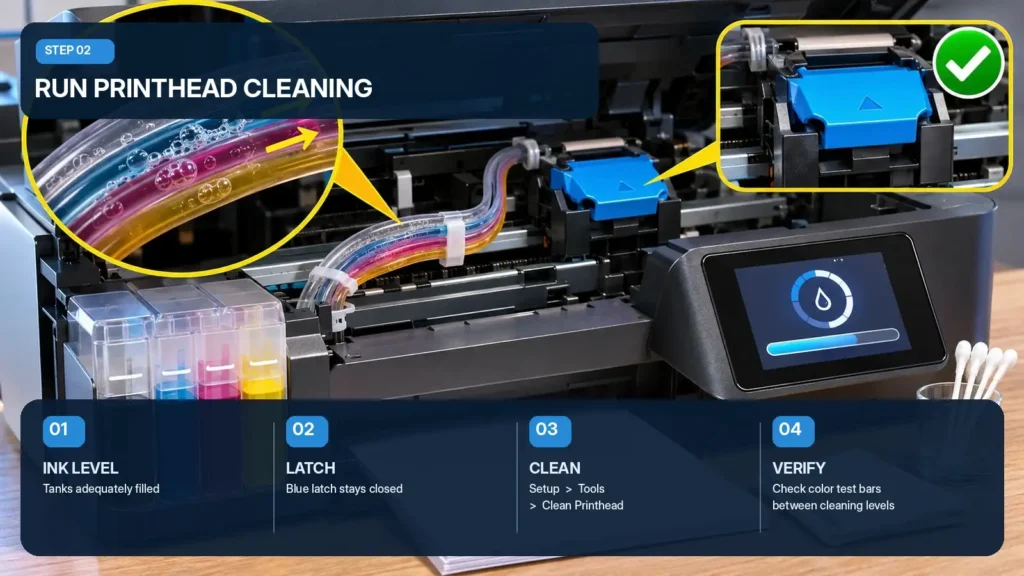
Check ink volume in all four reservoirs: Open the front door on the HP Smart Tank 530 and inspect the visual windows. Ensure the black (GT53) and cyan, magenta, and yellow (GT52) tanks are at least half full before starting. If refilling, let the bottle drain naturally into the tank spout without squeezing the bottle.
-
Confirm the carriage latch is locked: Open the printhead access door only to visually verify that the blue printhead latch is snapped firmly down and that no carriage obstruction exists. Do not lift the blue latch, as doing so will introduce additional air into the tubes. Close the access door and front door.
-
Load plain white paper: Place several sheets of plain A4 or Letter paper into the rear input tray so the printer can output diagnostic patterns between stages.
-
Start Level 1 cleaning from the 2.2-inch touchscreen: On the printer control panel, tap the Setup icon (gear symbol), select Tools, and tap Clean Printhead.
-
Advance to Level 2 and Level 3 cleaning if air or missing colors persist: The printer executes the first cleaning pass and prints a Print Quality Diagnostic page. Examine the cyan, magenta, yellow, and black color blocks. If bars are streaky, faded, or completely missing, follow the touchscreen prompt right away to run the next cleaning level. Level 2 and Level 3 perform the deeper purge equivalent to an hp smart tank 530 ink flush.
-
Allow a 30-minute resting interval after deep cleaning: If you complete all three cleaning levels and small micro-bubbles still cause faint horizontal lines, wait 30 minutes before printing another diagnostic report (Setup — Reports — Print Quality Report) or starting another cleaning sequence. This pause allows micro-bubbles trapped inside the thermal printhead chamber to rise away from the firing resistors.
What If HP Smart Tank 530 Tubes Remain Empty After Cleaning?
Because the HP Smart Tank 530 relies on its capping station pulling suction through the installed printheads, the system cannot purge the tubes if the printhead itself is vented, improperly seated, or electrically dead:
-
Reseat or replace a starved printhead: If one printhead was installed with its orange protective plug partially obstructing the air vent or if its nozzle plate is completely encrusted, the capping pump cannot pull vacuum through the attached tubes. Power off the printer, carefully remove the affected printhead when instructed, gently dab only the copper electrical contacts and nozzle perimeter with a lint-free cloth slightly dampened with distilled water, and snap it firmly back under the blue latch.
-
Inspect for manifold air leaks: If air bubbles continuously enter the tube from the carriage end every time the printer sits idle overnight, the rubber seal between the tube manifold and the printhead inlet is either dirty or failing to compress, allowing gravity to pull the ink column backward into the tank.
Software Ink Tube Flushing on Epson, Canon, and Brother Tank Printers
Other CISS manufacturers provide dedicated high-suction tube purge utilities separate from routine nozzle cleaning. Because these utilities push a substantial volume of ink directly into the waste absorber system, follow the manufacturer prerequisites strictly.
| Printer Platform | Built-In Tube Purge Utility | Minimum Tank Level Required | Critical Operating Limit |
| Epson EcoTank | Power Cleaning / Power Ink Flushing | At least one-third full across all tanks | Wait 12 hours between Power Cleaning cycles; accelerates ink pad or maintenance box saturation |
| Canon MegaTank (PIXMA G-Series) | Ink Flush (All colors or selected group) | Sufficient ink in tanks (visually well above lower limit) | Consumes heavy ink volume; checks remaining capacity in the maintenance cartridge before running |
| Brother InkBenefit Tank (DCP-T / MFC-T) | Special Cleaning / Deep Head Cleaning | More than half full in all four tanks | Uses maximum pump force; tank caps must be pressed tightly closed before starting |
Epson EcoTank (Power Cleaning and Power Ink Flushing)
On Epson EcoTank models, standard Head Cleaning clears minor nozzle dropouts, whereas Power Cleaning (or Power Ink Flushing on models equipped with a user-replaceable maintenance box) is specifically engineered to purge air from the internal inkjet printer tube lines:
-
Visually inspect all ink tanks and refill any color that sits below the one-third mark. Running a Power Cleaning with insufficient ink can damage the piezoelectric printhead.
-
From the printer control panel, open Settings or Maintenance and select Power Cleaning (or launch it from the Maintenance tab in the Epson printer driver on Windows or macOS).
-
Once the purge finishes, run a Nozzle Check to confirm solid staircase lines for every channel.
-
If small gaps remain, wait a full 12 hours before running a second Power Cleaning. Often, resting overnight allows remaining foam inside the damper chamber to settle without wasting another tank fraction of ink.