

Canon MegaTank (System Ink Flush)
Canon PIXMA G-series printers provide a three-tier maintenance hierarchy: Cleaning, Deep Cleaning, and Ink Flush. Only Ink Flush draws enough volume to empty and refill the full length of the supply tubes:
-
Press the Setup button (wrench and pliers icon) on the printer, navigate to Maintenance, and press OK.
-
Scroll to Ink Flush and press OK. On models that allow selective flushing, choose whether to flush All colors, BK (Black), or C/M/Y (Color) so you do not waste ink on channels that are already printing cleanly.
-
Wait while the pump draws fresh ink from the reservoirs through the tubes and into the waste absorber or replaceable maintenance cartridge. Do not unplug the printer or open the top cover while the cycle is active.
Brother Ink Tank (Special Cleaning)
On Brother DCP-T and MFC-T series tank printers, when regular cleaning cycles cannot clear air from the supply lines, Brother provides a high-power Special Cleaning mode:
-
Open the ink tank cover and verify that all four tanks are filled more than halfway. Close the tank caps firmly—loose caps can affect internal pressure during a heavy draw.
-
Access the Maintenance or Cleaning menu from the control panel or Brother iPrint&Scan / Printer Properties utility and run the Special cleaning method for Black, Color, or All channels.
-
Print the Print Quality Check Sheet and inspect the four color blocks for missing dashes.
When and How to Perform a Physical Ink Tube Replacement
If software ink tube flushing fails because the tubing itself is cracked, chewed by rodents, permanently flattened at a chassis bend, or clogged with hardened ink sludge from mixing incompatible inks, an ink tube replacement is the only durable repair.
Hardware Servicing Warning: Replacing internal CISS tubing requires partial disassembly of the upper scanner housing and direct work near the printhead carriage and main logic board. Unplug the power cord before opening the casing. If your printer is under warranty, contact authorized service rather than disassembling the ink path.
1. Prepare the Carriage and Prevent Siphoning
-
Turn the printer on, open the access cover so the printhead carriage moves out of its locked home station (or use the model’s manual service release lever after powering down), and then unplug the AC power cable from the wall.
-
Before detaching any inkjet printer tube from the carriage dampers or tank outlets, place lint-free absorbent pads around the carriage path.
-
Because ink tanks and carriage inlets sit at nearly the same elevation, detaching an unclampable tube with full reservoirs will cause ink to siphon out by gravity. Clamp each tube near the tank outlet using a smooth, non-serrated plastic tube clip before pulling the hose off its barbed fitting.
2. Select Compatible Replacement Tubing
Not all flexible plastic hose works inside a moving printer carriage. When sourcing an OEM tube harness or bulk multi-channel CISS ribbon tubing for an ink tube replacement, verify three parameters:
-
Material flexibility: Silicone tubing remains supple across temperature shifts and resists developing a “memory kink” as the carriage sweeps thousands of times across the platen. Stiff PVC tubing can push against the carriage, causing belt drag or false carriage-jam errors (such as Error E3 on HP Smart Tank units or carriage stall codes on Epson and Canon printers).
-
Exact inner and outer diameter (ID/OD): The inner diameter must grip the plastic barbed nipples on the tank outlet and the printhead damper/manifold tightly without splitting or leaking air under negative suction.
-
Support film and clip alignment: Many factory CISS harnesses pair the ribbon of four or six tubes with a thin, flexible polyester support strip that keeps the loop upright inside the chassis. Transfer that plastic guide strip and all intermediate routing clips in their exact factory orientation.
3. Route and Seat the New Inkjet Printer Tube Assembly
-
Disconnect the damaged tubing from the damper inlets (Epson/Brother) or carriage manifold adapter (HP/Canon) by pulling straight off the barb—never pry sideways with a metal screwdriver, as snapping a plastic barb requires replacing the entire damper or carriage manifold.
-
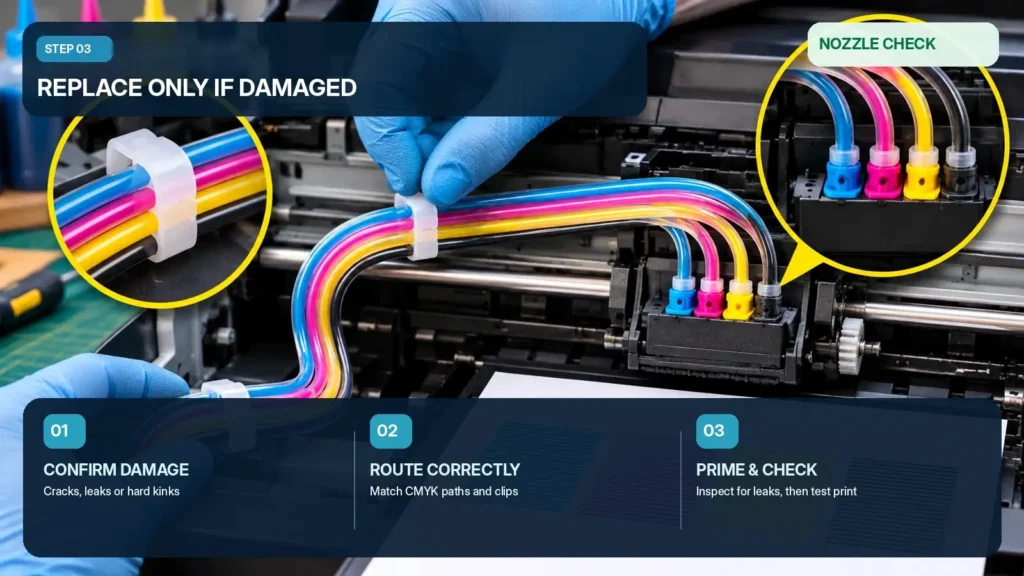
Push the ends of the replacement tubing fully onto the tank barbs and the carriage/damper barbs, matching each color channel carefully from tank to head so you do not cross-connect cyan, magenta, yellow, and black lines.
-
Secure the ribbon into every chassis clip and leave the exact factory slack loop required for full carriage travel.
-
Perform a manual dry-travel test: Before reconnecting power or priming ink, slide the printhead carriage slowly by hand all the way to the left side and all the way to the right side of the rail. Watch the inkjet printer tube loop. It must roll smoothly without rubbing the paper encoder strip, catching on the scanner lid hinges, or pulling taut at either extreme.
4. Prime the New Tubes and Verify Electrical Safety
Once the new tubing is installed, it is completely filled with air and must be primed before printing:
-
Remove the temporary hose clamps and confirm that no ink leaks at either the tank fittings or the carriage adapters.
-
Inspect the carriage area carefully. If a single drop of ink splashed onto the white Flat Flexible Cable (FFC) ribbon or printhead contact pins during tube installation, clean and dry it completely before plugging in the power cord. Powering on a printer with wet ink on the head ribbon cable can short the printhead driver transistors and blow the mainboard head fuse.
-
Reassemble the housing, plug in the printer, and run the brand-specific ink tube flushing utility (or prime the individual dampers using a model-specific service procedure prior to seating them) until solid columns of ink reach the carriage and the Nozzle Check / Print Quality Diagnostic Page prints without missing segments.